Network Configuration for a Wi-Fi Access Point

Network Configuration for a Wi-Fi Access Point

This page describes how to configure the network interfaces for a Raspbery Pi running as a Wi-Fi Access Point (AP). This is just one step in a larger list of instructions, which can be found on the page Raspberry Pi Wifi Access Point. The instructions here do not include the routing, which is covered later.

We need to configure two networks, the “local” network managed by hostapd to be a Wi-Fi Access Point (AP), and the “upstream” network connection to the Internet. The upstream network can be wired or Wi-Fi, and it could use a fixed IP address, or it could be a DHCP client, so there are lots of possible variations. We will use wlan0 for the Wi-Fi Access Point, since we will always have that on Wi-Fi, and use wlan1 if the upstream network connection is also via Wi-Fi.

Local Area Network (LAN) for the Access Point (AP)

The first Wi-Fi adapter, called wlan0, will be used for the Wi-Fi Access Point (the local network). It’s best to use the IP address range for a Private Network.1 For a small home network you can put the following (or something like it) in the file /etc/network/interface:

allow-hotplug wlan0
iface wlan0 inet static
  address 192.168.47.1
  network 192.168.47.0
  netmask 255.255.255.0
  broadcast 192.168.47.255
  gateway 192.168.47.1

This configuration is for a “Class C” network, which can have up to 254 IP addresses. For a large public event or venue you will probably want to use a class B or even a Class A network.2  In that case you can use the values in Table 1 to fill in the appropriate fields in the interfaces file.

Name Size address network netmask broadcast gateway
Class C 254 192.168.47.1 192.168.147.0 255.255.255.0 192.168.47.255 192.168.47.1
Class B 65,534 172.16.0.1 172.16.0.0 255.240.0.0 172.16.255.255 172.16.0.0.1
Class A 16,777,214 10.0.0.1 10.0.0.0 255.0.0.0 10.255.255.255 10.0.0.1

Table 1. Private Network settings for Class C, B, and A networks.  For more details on private networks see RFC 19183


Upstream Connection

There are several different ways to make the upstream connection.   It can be wired or Wi-Fi, and it could have a static IP address or it could get an address and other network settings from a DHCP server.

EDITED TO HERE

We will put the configuration for each interface in a separate file in the directory to make it easier to select which upstream interface to use, and also because it allows you to be a DHCP client on the upstream link.

(If you have a static or dhcp interface in /etc/network/interfaces then the dhcp client won’t start.4) If your access point won’t act as a DHCP client (it will definitely be a server, but that is different) then you can put all the configuration into the one file /etc/network/interfaces.

First, add the following to the top level file, /etc/network/interfaces:

# wlan0 is the Access Point

allow-hotplug eth0
allow-hotplug wlan1
# Now read full interface configuration from the subdirectory
source-directory /etc/network/interfaces.d

That last line is what reads the other files in that subdirectory. I have found that it is important to use allow-hotplog for wlan0 instead of auto; When I used auto then hostapd could not find wlan0, though it was up later when I checked. Maybe the boot order is different?


  • The upstream connection can be either via wired ethernet, on interface eth05 or via Wi-Fi, on interface wlan1. I will describe both and you can pick one or the other to connect to the Internet.  It’s even possible to have both upstream links enabled at the same time — in case one fails the other will still work. You have to decide if you use DHCP (as a client) or a static the IP address and netmask and gateway.


First, put the following in the file /etc/network/interface.d/wlan1 for the second wireless interface:

iface wlan1 inet static
  address 192.168.1.99
  network 192.168.1.0
  netmask 255.255.255.0
  broadcast 192.168.1.255
  gateway 192.168.1.1
  wpa-ssid "UpstreamSSID"
  wpa-psk "PassWordGoesHere"
  wpa-group TKIP CCMP
  wpa-key-mgmt WPA-PSK

Next, add the following to /etc/network/interface.d/eth0 for the wired upstream connection:

iface eth0 inet dhcp

These are just examples – you could use a static IP address for the wired interface, or use dhcp for the upstream WiFi connection. Having an entry for an interface that does not exist won’t cause problems.

Either way, we will come back to edit these files when we set up the routing tables, which
is describe in “Raspberry Pi Access Point Routing Tables.”

Notes and References

  1. https://en.wikipedia.org/wiki/Private_network
  2. Cisco Networking Academy > CCNP 1: Advanced IP Addressing Management > Private Addressing and NAT.
  3. RFC 1918: Address Allocation for Private Internets https://datatracker.ietf.org/doc/html/rfc1918
  4. See the file /usr/lib/dhcpcd5/dhcpcd.
  5. It may have a different name if you have enabled “predictable” network interface names

Raspberry Pi WiFi Access Point

Raspberry Pi WiFi Access Point

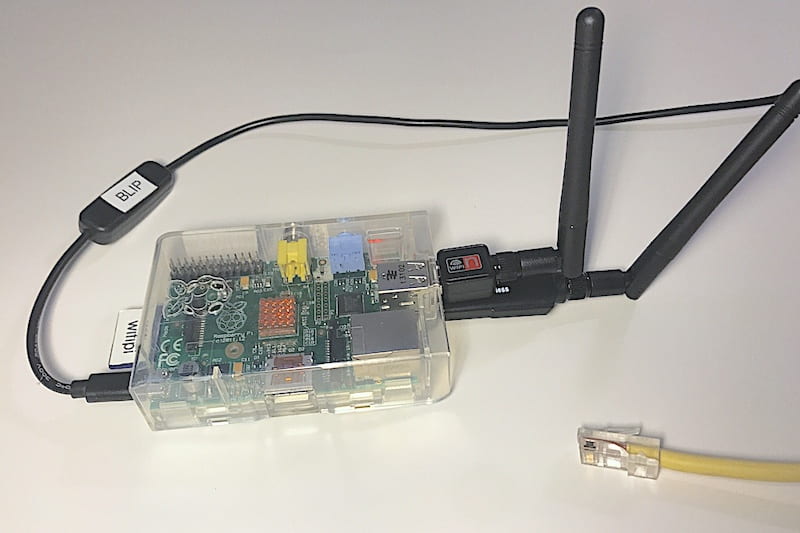
I have an old iPad which has been dropped so many times that a piece of wire fell out the side, and I think that wire was the WiFi antenna. The iPad can only connect to WiFi when it’s close to the access point or when the signal is very strong. I figured out that my young daughter could still use it in the kitchen, far from the router, if I put a WiFi repeater in the kitchen. As it turns out, this also extends WiFi to the back patio, which is an added bonus.

I originally used an old Raspberry Pi 1B for this, and that’s still what I’ve mainly been using. It’s a good use for old hardware. It runs headless, with 2 USB wifi dongles, and sits under a cupboard just like lots of other modern appliances.  But I’ve also tried this out with models 2B and 3B. The model 3B has an internal wifi interface, so you only need to add one extra USB dongle. The original wifi dongles did not have antennas, and that limited their range, so I’ve recently upgraded to the ones with antennas, as shown in the picture above.

This page was started in the summer of 2018, when I used Raspbian Stretch on a Raspberry Pi 1B, but the most recent revision was in December 2020 and I’ve made some improvements.1 I originally used instructions from user Dryfire117 on pastebin2.   I later found useful instructions on the Raspberry Pi website.3  After going through the process several times and experimenting with variations I have been able to simplify things in several ways. For one thing, you can use either WiFi or wired ethernet for the upstream connection.

I’ve broken this up into several separate pages, because some of these steps are useful for related projects that I’ll be reporting on later, and because I think it’s just easier to follow and understand when it’s broken into separate parts like this. Here are the key steps:

  1. Setup a new SD card

    After flashing a new image on an SD card, boot it up and perform the “usual” set of configuration steps, as describe in “Raspberry Pi Initial Configuration” or your other favorite source.

  2. Configure Network

    We need to configure two networks, the “local” network managed by hostapd to be a WiFi Access Point (AP), and the “upstream” network connection to the internet. The upstream connection can either be wired or also via WiFi.  The steps required to set this up have grown to the point that they have been put into a separate page, “Network Configuration for a WiFi Access Point.”

  3. Install and configure hostapd

    When I originally started doing this, you had to build hostapd from source code to get the nl20211 driver, but newer versions of Raspbian now include that driver by default, making things a bit easier. There are still a number of steps required to configure hostapd.  Follow the instructions in the article “Configuring hostapd on Raspberry Pi.”

  4. Set up DHCP server

    The DHCP daemon is what assigns IP addresses to the computers that join your private network. Follow the instructions in the article “DHCP Daemon on Raspberry Pi.”

  5. Configure NAT routing

    Everything so far sets up an access point. Now we also need to configure the routing tables to perform Network Address Translation (NAT) and add a default route. Follow the instructions in the article “Raspberry Pi Access Point Routing Tables.

  6. Add DNS servers (optional)

    The file /etc/resolv.conf contains the names of Domain Name Service (DNS) servers, but on Raspberry Pi this file gets overwritten at each reboot. It will probably contain the IP address of your upstream router, but nothing more. It is useful to have more nameservers for redundancy, in case one of them has a problem. Also, I now have a piHole DNS server on my local network, and I’d like to have anything on my internal network use that. The simplest way to do this is to edit the file /etc/resolvconf.conf and add a line like this:

    name_servers=192.168.1.29 1.1.1.1 8.8.8.8

    Take a look at /etc/resolv.conf after a reboot to confirm that these made it into the list.

  7. Add Monitoring (Optional)

    Since this device will run headless it can be useful to have a status display provided by a web page. This is easily done by adding a web server, either Apache or NGINX, which is described well on the Raspberry Pi website.4 In either case the main web page for the server lives in the directory /var/www/html/. You could make a simple HTML web page in the file index.html, or something more dynamic as a PHP script called index.php (such as this).

  8. Save Everything

    It’s useful to have a list of all the files you’ve modified to make this all work, so that you can go back and make checks or changes, so that you can make backup copies, and so that you can easily deploy the same files to another machine. I put the list into a file called wifipi_files.txt:

    /etc/network/interfaces 
    /etc/network/interfaces.d/
    /etc/default/hostapd
    /etc/hostapd/hostapd.conf
    /etc/default/isc-dhcp-server
    /etc/dhcp/dhcpd.conf
    /etc/resolvconf.conf
    /var/www/html/index.php

    It is then simple to make a tar archive (tarball) containing just these files, using the command
    tar -czP --files-from=wifipi_files.txt -f wifipi.tgz
    The -P flag preserves the full file path when the file is saved in the tarball. To deploy these files on another machine simply copy the tarball to the other machine and (as root or using sudo) give the command
    tar xzf wifipi.tgz
    to extract them into place.

References and Notes

  1. The original title of this page called this a WiFi “repeater”, which is somewhat ambiguous. The instructions here turn the Pi into an “Access Point” which has its own local network. It’s also possible to turn a Pi into a “bridge,” which just extends an existing network. I may try that out (and document it) in the future.
  2. How to: Make a Raspberry Pi Powered Wifi Repeater” by Dryfire117,  https://pastebin.com/A4jUp2Nq
  3. Setting up a Raspberry Pi as a routed wireless access point,” https://www.raspberrypi.org/documentation/configuration/wireless/access-point-routed.md
  4. Setting up a web server on a Raspberry Pi https://www.raspberrypi.org/documentation/remote-access/web-server/

Raspberry Pi Access Point Routing

Raspberry Pi Access Point Routing

This is the last step required to turn a Raspberry Pi into a WiFi Access Point. If you want to see all the previous steps, start with “Raspberry Pi Wifi Access Point“.   When you get to this page you should already have done the following:

  1. Configured both network interfaces,
  2. Set up hostapd (a daemon which lets a host become an Access Point), and
  3. Installed and configured a DHCP server.

I originally followed more complicated instruction from user Dryfire117 at pastebin.com, 1 and then later became aware of a simpler way to do the same thing which is documented on the Raspberry Pi website.2 I think the way presented below is just as simple as the latter.

  1. First, we need to enable IP forwarding by the Linux kernel, by editing the file /etc/sysctl.conf and uncommenting the line:
    net.ipv4.ip_forward=1
    

    You will  need to be root or use sudo to edit this file.  An alternative is to put this single line in the file/etc/sysctl.d/routed-ap.conf.   Either way, this will take effect at the next reboot.

  2. Next we will use iptables to add a routing rule to do Network Address Translation (NAT), and then add a default route. This is simply done by editing the configuration file for the upstream interface in the directory /etc/network/interfaces.d/ – either eth0 for a wired upstream interface, or wlan1 for a wireless upstream interface. Either way, add the following two lines to the file as part of the configuration for that interface:
    post-up  iptables -t nat -A POSTROUTING -o eth0 -j MASQUERADE
    post-up  route add default gw 192.168.1.1  eth0

    As you might suspect, commands given after the “post-up” keyword are performed after the interface has successfully been brought up.  The IP address after “gw” is the gateway address for the upstream network.

  3. Reboot and verify that it’s all working, or to debug it if it isn’t.

I have tested using both upstream interfaces at the same time, but you really can’t. When both eth0 and wlan1 are brought up it seems that they compete and the IP masquerading setting for only one of them takes effect. That’s actually good, because if you delay one to let the other finish, so that you have IP masquerading set up for both interfaces, then it just doesn’t work (at least not if they are both on the same upstream network).

References

  1. How to: Make a Raspberry Pi Powered Wifi Repeater by Dryfire117, https://pastebin.com/A4jUp2Nq
  2. Setting up a Raspberry Pi as a routed wireless access point, https://www.raspberrypi.org/documentation/configuration/wireless/access-point-routed.md

DHCP daemon on Raspberry Pi

DHCP daemon on Raspberry Pi

DHCP stands for “Dynamic Host Configuration Protocol”.    The DHCP daemon is the process which assigns IP addresses to computers when they join a network, and gives them other important information about the network, including DNS server addresses. A local network used for a wireless Access Point usually has a DHCP server associated with it. It’s important to note that this is a DHCP server for the local network, but the AP may also act as a DHCP client to get it’s own network configuration information from the upstream link. These are two different things.

There are several packages that you can use to run a DHCP server. I chose the ISC DHCP server package (isc-dhcp-server), but I later learned that one can also use the dnsmasq package as a DHCP server.1 Choose one or the other.

Here is how I set up and configured dhcpd on Raspbian Stretch, using the isc-dhcp-server. This page was originally written in 2018, but I recently updated it in December 2020.

  1. Install: Install the package:
    sudo apt-get install isc-dhcp-server
    When you install this package it is configured to run automatically at boot time (
  2. Configure: There are two files to edit or check:
    1. Move the existing file /etc/dhcp/dhcpd.conf out of the way so you can replace it with your own:
      sudo mv /etc/dhcp/dhcpd.conf /etc/dhcp/dhcpd.conf.ORIG
      (You should keep it because it contains good documentation and examples).
      Then create and edit a new file /etc/dhcp/dhcpd.conf containing:2

      #                                                                               
      # Configuration file for DHCP server on Rasberry Pi                             
      #                                                                               
      ddns-update-style none;
      option domain-name "wifipi.local";
      option domain-name-servers 8.8.8.8, 1.1.1.1, 192.168.1.1;
      default-lease-time 3600;
      max-lease-time 86400;
      authoritative;
      log-facility local7;
      
      # Configure service for local network 192.168.47.0 (the wireless AP)                    
      subnet 192.168.47.0  netmask 255.255.255.0 {
          range 192.168.47.50  192.168.47.250;
          option routers 192.168.47.1;
      }
      ##
    2. Also edit the file /etc/default/isc-dhcp-server to add the line:
      INTERFACESv4="wlan0"

      Change the name of the interface to the local network if you are using something else.

  3. Add a Delay: While I could start the service “by hand” once the Pi had booted, I found that the ISC DHCP server would sometimes not start at boot time, even though it is configured at installation to do so. When that happened I found a complaint in the log file (viewed with `grep dhcp /var/log/syslog`) like this:
    dhcpd[345]: Not configured to listen on any interfaces!

    The problem appears to be that the server is brought up at the same time the interface is being configured, and sometimes the interface is not ready yet. A simple solution3 is to add a slight delay to the init script that brings up the DHCP server. I edited the file /etc/init.d/isc-dhcp-server and found the line (in the start_daemon() function) which actually starts the daemon. I then added a sleep of a few seconds (at least 4 seemed to be needed) right before it. The code should look something like

            sleep 4
            start-stop-daemon --start --quiet --pidfile $PIDFILE \
                    --exec /usr/sbin/dhcpd -- $VERSION -q -cf $CONF $INTERFACES
            sleep 2

    As you can see, there is already a sleep of 2 seconds right afterwards to let the daemon get started.

    A more elegant solution would be to create a systemd service file for this daemon. If that’s not been done in a newer release of the Raspberry Pi OS (I will check at some point) then I may do that and report the result. Another solution, of course, is to use dnsmasq instead.

Notes and References

  1. See Setting up a Raspberry Pi as a routed wireless access point at https://www.raspberrypi.org/documentation/configuration/wireless/access-point-routed.md
  2. “How to: Make a Raspberry Pi Powered Wifi Repeater” by Dryfire117, https://pastebin.com/A4jUp2Nq
  3. Found on StackExchange, of course: https://askubuntu.com/questions/58032/dhcp-server-doesnt-start-at-boot-because-of-wrong-startup-order
Skip to toolbar