Microsoft Teams is Frankenstein’s Monster

Microsoft Teams is Frankenstein’s Monster

Microsoft Teams is a collaboration app that provides text, video and audio collaboration tools with shared files and calendars. The diagram shows how it is linked to Microsoft Outlook, OneDrive, and SharePoint. Those connections are described here, along with instructions on how to link files from SharePoint into your personal OneDrive folder.

Microsoft Teams is a computer application for group collaboration, mainly aimed at businesses, but also used in higher education. But what is it really? The first example I saw was the chat feature, so I assumed it was something like Slack or Discord. But it also has video conferencing, so maybe it’s like Zoom or WebEx (though Slack and Discord now also support chat). But since it is Microsoft it also has a calendar and can connect to files on SharePoint and OneDrive. Teams is a lot of things in one, and after I started seeing those various parts linked together I though of the parable of the blind men and the elephant,1 , where each man described the elephant differently because they only had contact with one or another part. But what I’ve come to realize is that Microsoft Teams is actually Frankenstein’s Monster.

Meme: Knowledge is knowing that Frankenstein is not the monster. Wisdom is knowing that Frankenstein is a monster.
Figure 1: Which one was the monster?

What I mean by this is that Teams is really like a bunch of existing body parts sewn together and brought to life. Even so, we now have Microsoft tools here at SUNY New Paltz — our cloud storage is SharePoint and OneDrive, our Email and Calendar services are provided by Outlook, and now we have group chat and direct messaging via Teams.  Microsoft has sewn them all together, and we have to live with the Monster and learn to use it as best we can.

So here are my observations and tips on how to get along with Teams, including how to create a link from your personal OneDrive folder to files stored in SharePoint.

Overview

First, to really understand the whole thing I had to map out the connections between the various components, which resulted in Figure 2:

Block diagram of the various components of Microsoft Teams and how they are connected.
Figure 2: Microsoft Teams and how it is connected to SharePoint, OneDrive, and Outlook.

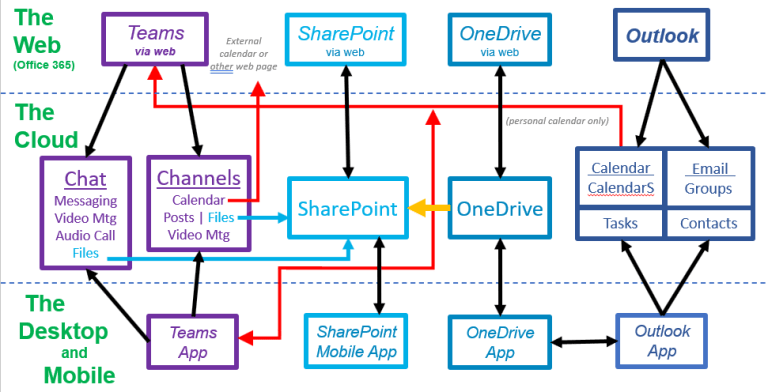
(I should mention that there are additional connections that are not shown in the diagram to make it a little easier to understand.)

One of the key features of Teams is that all the data lives on servers, “in the cloud,” and can be accessed either by native desktop apps, or apps on mobile devices, or via a web browser from wherever you happen to be. That’s shown by the horizontal layers separated by dashed lines.

The colors help identify the functions that are performed by various separate apps in the Microsoft toolkit. The dark blue boxes on the right represent Outlook, which handles email, calendars, task lists, and contact lists.  The purple on the left shows the functionality of the Teams app, which provides group chat as team “channels” as well as direct messaging (DM’s) via “chat,” either with one person or smaller groups.  A Channel is a subset of a Team.  The Teams apps also provide video conferencing either within a Channel or within a Chat, as well as audio-only calling between individuals.2

In the middle we have cloud file storage, with SharePoint in light blue and OneDrive in a slightly darker blue.  What’s the difference?  As someone once explained to me,3 “SHAREpoint is for sharing, while ONEdrive is for one person.” In other words, OneDrive is for personal file storage, while SharePoint is for shared group files.  SharePoint files can be accessed via the web or via a mobile app, but there is no desktop app.  OneDrive files can be accessed via the web, via a mobile app, and via a desktop app which adds a folder to your computer as if the files were on an extra hard drive connected to your computer.  By default, SharePoint files cannot be accessed from the desktop (but see below on how to add the “golden spike”).

Interconnections

Now we can explain the relationships shown by the arrows. As you might expect, the apps on the web, desktop, or mobile can be used to access their corresponding data in the cloud. Those are represented by the black arrows. But there are also connections between them. The blue arrows show that both Chats and Channels in Teams can access and store files in SharePoint (but not OneDrive).

The red arrows show calendars.  In Teams you can access your own personal calendar, though apparently not any other calendars in Outlook that you might have created or manage.4   It’s also possible to create a calendar for a Channel in a Team, but this calendar is not related to any calendar in Outlook.   It’s possible to share calendars between Teams and Outlook by sharing links to them just as you would share a calendar with anybody else by sending them a link, but there are no automatic connections, except for your personal calendar.

There are some other connections between the main components which are not shown in the diagram, lest it become overly complicated (as if that has not happened already).  In Outlook it is possible to have a Group of people who share a common calendar and are all on the same email list, and an Outlook Group can share files in SharePoint in what is called a Site.  An Outlook Group can have a Team, and for this team each Channel has a folder in SharePoint.

Also not shown in the diagram are relationships to other Microsoft tools, such as Bookings and Forms.5,6  Those could be the topic of other articles (but not by me).

The Golden Spike

The most important arrow is the small one in gold joining OneDrive to SharePoint.  It is not there by default, you have to create it.  And if you like using OneDrive on the desktop, then you will want to create it. As you can see from the diagram, you can access both OneDrive and SharePoint via the web, and the same is true for mobile — using separate apps.  On the Desktop, you can only access your own files via OneDrive. On a desktop or laptop computer running the OneDrive app your files show up as just another folder that you can navigate like any other set of folder using the File Explorer (in Windows) or the Finder (on a Mac).  It essentially extends your hard drive into the cloud.  But there is nothing comparable for SharePoint — except that there is, once you create that golden link between the two. It’s like the golden spike that joined the east coast and west coast by rail so many years ago.7

All you have to do is create a link from a SharePoint directory to your own files in OneDrive, and you can then navigate to the files in SharePoint as if they are another folder on your computer, just like OneDrive.  You can only create this link from the web, but once you do then it works for the Desktop and Mobile apps.  SharePoint files then become available as folders on your computer just like OneDrive files.8

Here’s what you need to do to create the link:

  1. Log in to SharePoint and navigate to the top level folder you wish to access via OneDrive:

    One way to do this is to open Office 365 as you do to read email, then click on the “App Launcher” in the upper left corner (the icon looks like a waffle) and select SharePoint. In the stack of icons along the left side of the page select the “globe” icon for “My Sites” and then select the Site you wish to link to.  Then select “Documents” in the left side menu.

  2. Navigate to the folder you wish to link to. This could be the top-level directory of folders, or it could be one of the folders under it, but keep in mind that once you link to a folder, you cannot make another link further down in the directory hierarchy, or further up.  You only get one shot.
  3. At the top of the listing of the folder you wish to link to are a set of functions such as “Upload” and “Share” and “Copy link,” and among those is one labeled “Add Shortcut to OneDrive”.   But since it is one of the latter ones it might not be visible, in which case you can use the “…” icon to show the full list of options.   Select that one.
  4. The new link to this SharePoint folder will now appear in your top-level OneDrive folder.  You can move it anywhere you want it within OneDrive, either by dragging it in the desktop File Explorer (or the Finder on Mac) or using the web version of OneDrive (which you can get to via the “waffle” icon for the App launcher and then selecting “my files”).  Just make sure you don’t have two such links in the same directory tree, one above the other.
Boris Grishenko (Alan Cumming) send a software "spike" and celebrates in the James Bond movie "GoldenEye" (1995)
Figure 3. Boris Grishenko (Alan Cumming) celebrates his spike (from the 1995 movie “GoldenEye).

Congratulations, you have just driven the Golden Spike and connected files shared on SharePoint to your personal set of files in OneDrive, and now you can get to those SharePoint files using OneDrive.  Easy, eh?  Go ahead, celebrate!

Teams Technical Tips

At one point after using Teams for a while I found that I was not able to access files that are a part of a Teams Channel.  I was able to trace the problem to my cookie settings. By default, I don’t allow third-party cookies for security reasons, though that can sometimes cause problems with a site (for example, see Starfish Requires Third Party Cookies). Since the files are actually stored in SharePoint, the problem went away once I allowed third-party cookies from sunynp.sharepoint.com.  In general it is a good idea to block third-party cookies, but then allow them from sites you trust when they are needed to make something useful functional.


Last revised on 19 January 2024

Notes

  1. The Parable of the Blind Men and the Elephant (on Wikipedia)
  2. But as far as I can tell, not with the whole teams or with a smaller group, but I suppose you could turn off your video.  Maybe I’ve missed how to do a voice “teleconference” or maybe Microsoft wants to do away with those.
  3. Thank you, Max Kenney!
  4. If this is not true I would love to be corrected, but I have not found any way to connect to any Outlook calendar but my own.
  5. See  Collecting Student Lab Data with Forms in Office 365
  6. Though this looks rather interesting: Create a task in Planner from Microsoft Forms and post message in Teams
  7. The Golden Spike (on Wikipedia)
  8. One consequence of this is that you don’t need the separate SharePoint mobile app, since you can access all your OneDrive and SharePoint files using the OneDrive mobile app, and you don’t

Signing Documents with Adobe Acrobat Reader

Signing Documents with Adobe Acrobat Reader

It is possible to use Adobe Acrobat Reader to “sign” documents.  There are actually several levels of both security and complexity, so depending on what you want to do you can either choose the easiest, or the most secure (well, at least more secure).   Here are the options:

  1. Add an image of your hand-written signature (easiest, but least secure).
  2. Add a digital signature using a self-signed certificate (more secure)
  3. Add a digital signature using a self-signed certificate and an image of your handwritten signature (fancy!)
  4. Add a digital signature using a certificate signed by a Certificate Authority (even more secure)

So Many Options

This topic can be confusing because an “on-line” signature can mean any of these, and each one is different from the others:

Option 1 is the easiest, and it’s basically a (less secure 1) replacement for the  steps of  a) printing something out, b) signing it with a pen, and then c) scanning it to send to someone else.   The idea is that you load a photo of your personal signature into Acrobat Reader (or you create a signature with the mouse — but who can do that?) and then Acrobat Reader can overlay this signature onto your document.   But this option is not the most secure, because after all, if you can add an image of a signature, so can someone else.

Option 2 adds a digital signature to the document, which is more secure.  To set this up you create a “certificate” file, which is encoded by a password.   (Adobe Reader helps you do this.)  Whenever you want to sign a document you will simply type that secret password to add the signature.  This is more secure than option 1, with not much extra work to set up at the beginning, so this is probably what you want to do.  It’s still possible for someone to spoof a signature by just creating a digital signature with your name on it, but it won’t match the digital signature you usually use, so it will be possible to spot a forgery if someone checks it carefully — and Acrobat Reader can check signatures automatically.  It can also show a warning if the document has been altered after it has been signed.

Option 3 is an extension of Option 2 which lets you add an image to your handwritten signature.  The image could be anything, but the nice thing about this choice is that you can use an image of your hand-written signature so that it actually looks like you signed the document even to people who don’t know about digital signatures.

Option 4 adds extra authentication.  Instead of creating a “self-signed” certificate (that’s what is done in Option 2) the certificate you use to sign is itself signed by a higher-level certificate, from what’s called a Certificate Authority (CA).   This is how certificates work for secure web pages (that use https) to avoid spoofing.  This option is not currently available at SUNY New Paltz, and for everyday work documents that’s (probably) okay.

So there are really two options, and in Adobe Acrobat you choose them with two different tools:

  • To “sign” a document with an image of your handwritten signature, select the Tools tab and then open “Fill & Sign“.   [Details Below]
  • To sign the document digitally using a certificate, select the Tools tab and then open “Certificates”  [Details Below]

Either way, there is some initial set-up you have to go through the first time you sign document, and it’s a little bit different for each method.  But after that the process is fairly quick and easy whenever you need to sign a document, no matter which one you choose.

1. Adding a Signature Image

A digital signature is more secure, but if you really just want to add an image of your hand-written signature then here is how to do it:

  1. Write your signature on a blank piece of paper, take a picture of it and save it as either a JPEG or PNG file.  You’ll just have to add this image to Acrobat Reader the first time you sign something, and after that it will remember the image.
  2. Open a PDF document you wish to sign using Acrobat Reader, select the  “Tools” tab and click on “Fill and Sign“.
  3. Along the top of your document you will see the Fill & Sign toolbar.  Select “Sign Yourself”.   (You can also change the color of your signature here: click on the circle to select a pen color.)
  4. If you have previously loaded an image of your signature, it will be shown and you can just select it.   If you have not previously added a signature image then select “Add Signature”, and then..
    1. At the top of the window that pops up, select “Image”
    2. Use the file chooser to select the image containing your handwritten signature
    3. Press “Apply”
    4. Once you have a signature image loaded, click on it to select it.
  5. The image of your signature will appear over the document and you will already be dragging it around with the mouse.  Place it where you want to add the signature.  You can  use the dot at the lower right corner to resize it, or you can use the smaller or larger “A” buttons to shrink or enlarge the image.   You can also click on the image to drag it around for better positioning.
  6. Click anywhere away from the signature image to leave it in place.  Click back on the signature image to modify the position or size.  Once you save the document you will no longer be able to adjust the size or position of the signature.

(Note that on a Mac you can also do the same thing using the Preview app.  While viewing the document you want to “sign” pull down Tools → Annotate → Signature.  To load an image of your signature, click on “Manage Signatures…”  and follow the directions.  If you have already loaded an image then you can just click on it and it will appear overlaying your document.  Drag it into place and resize it. )

2. Signing with a Certificate

Signing with a certificate is a true “digital” signature.  Your certificate is a public key, signed by a private key (or by a Certificate Authority – but that option is currently not available at SUNY New Paltz), and used to create a digital signature.  Adobe Acrobat will do all the heavy lifting to create your certificate (and private key) – all you have to do is answer some simple questions.

  1. When you want to sign a document using a digital certificate, click on the Tools tab and open “Certificates,” then click on the “Digitally Sign”  button above the document.
  2. Use your mouse to drag out a rectangle where you wish to place the signature.  (When you first start signing documents you will be prompted to do this, but you can turn that prompt off. If you turn the prompt off but you don’t sign things often then you might get stuck waiting at this point.)
  3. If you have previously created a signing certificate (a “Digital ID”)  then it will be shown and you can select it.  If you have not yet  created a signing certificate then you will need to do that (only once), as follows:
    1. Select  “Configure Digital ID”
    2. Select the option to “Create a new Digital ID”
    3. Select the option to “Save to Windows Certificate Store”  to make your certificate public2
    4. Enter your Name, department, campus , and e-mail address.
  4. You will be asked to choose the Digital ID that you want to use for signing, and there is probably only one choice (though you can create multiple Digital ID’s if you wish — see below).  Simply select that ID (it’s probably already selected) and press “Continue”.
  5. You can click the “Lock document after signing” checkbox if you want that option,  but don’t do so if others need to add their signature.  (If you saved your Digital ID to a file, instead of saving to the Windows Certificate Store, then you would have created a password to protect your private key, and you’ll have to enter that password now.)
  6. Press the “Sign” button to sign the document.  You will be prompted to save the file, either using the same name and overwriting the original, or in a different file.

3. Digital Signature with Image

It’s possible (though a little bit more complicated) to create a digital signature which includes an image of your handwritten signature.  How cool is that?   If you are willing to go through a few extra hoops, this section describes how to do it

The way this works is that in Acrobat Reader your digital signature has the option to include an image, which is referred to by Acrobat Reader as a “logo.”  And since it is Adobe, your “logo” has to be a PDF file — it can’t be a JPEG or PNG image.   So you will need an image of your hand-written signature stored as a PDF file, however you manage to do that.   One easy way is to use the OneDrive app on your phone to scan your handwritten signature as a document.  On a Mac you can open the image with the Preview app and save as a PDF.

Once you have the PDF file on your computer, put it in the folder

C:\Users\<username>\AppData\Roaming\Adobe\Acrobat\DC\Security

where “<username>” is your own username on the computer.  The “AppData” folder is hidden by default, so to view it you may have to select the View tab when looking at your home directory and check the box for “Hidden items”.  This is where Adobe Acrobat stores PKI3 resources, so putting files here will make them more easily available to Acrobat Reader.

Since this is just an add-on to a regular digital signature, you should first create a “Digital ID” as described above under Signing with a Certificate.   With this in place, start out to sign a document using “Digitally Sign” (you’ll have to highlight a rectangle even if you don’t intent to complete the process).   Select the Digital ID and press “Continue”.  Before you press the “Sign” button, press “Create” at the top of the pop-up.   Now you will be able to customize the signature block, including adding the “logo” image.    Above the display of how the signature will look, select “Image,” and then below the display click on “Browse”.    You should see a list of files in the “Security” folder shown in the AppData path above, and this should include the PDF file of your hand-written image.   Select it and press “Open”. Then press “Save” to save this customized signature block.

Now whenever you sign a document with this Digital ID you simply have to select the rectangle for the signature block and press “Sign” to add both a true digital signature and an image of your hand-written signature.

4. Certified Signatures and Certificate Authorities

Before describing how this works, it’s important to know that we don’t use this at SUNY New Paltz, or (as far as I can tell) SUNY in general.  So this description is included only for completeness, and to point out that there is a more secure way to do digital signatures, which should be the goal.

A certified digital signature is sort of like having your signature witnessed by a Notary Public.   The notary also signs and marks the document to insure that the person claiming to be the right person was the one who signed the document.    In the digital world a Certificate Authority (CA) will create a digital signature of a person’s digital signing certificate, and this helps insure that the digital signature was not spoofed.

Managing  Digital ID’s

It’s possible to have more than one Digital ID, and to delete one you don’t want to use, or export one that you want to use on another machine.  To do any of this pull down the Edit menu to Preferences → Signatures and select “Identities & Trusted Certificates“.

  • To delete a Digital ID select it (highlight it) and then click on “Remove ID”
  • To export a Digital ID highlight it and click on “Export” .   You can save the certificate to a file or have it emailed to someone, and you can save it in several PKI formats.

Notes and References

  1. Option 1 is slightly less secure than actually signing a document and scanning it, because anybody who can get an image of  your personal signature can do the same thing
  2. This makes your certificate public, so that others can verify your digital signature, but it does not publish your private key.  The “Certificate Store” is “storage” for certificates, not a palace to buy them.  Your private key is (presumably) encrypted with your Windows Live credentials.  As a result, you don’t have to type in your password every time you sign a document, assuming you are logged in with your New Paltz ID.
  3. Public Key Infrastructure, the technology that underlies digital signatures and public key encryption.

Collecting Student Lab Data with Forms in Office 365

Collecting Student Lab Data with Forms in Office 365


An on-line form can be an easy way to collect data from students during a lab or class, and with the data automatically loaded into a spreadsheet it can then be straighforward to work with the data immediately.  Google Forms is one way to do this, but since SUNY New Palz is moving to the Microsoft Office 365 suite of tools we need to know how to do this in Office 365.  This article gives you enough information to get started, and those who are already familiar with Google Forms will see a lot of similarity.  This kind of form can also be used to give a quiz or perform a survey (though there may be better tools for that).

Figure 1: example of a QR code leading to a data input form.

It’s worth noting that students can even enter data from a mobile device once you give them the link to the form, and there are several ways to easily distribute the link, including displaying a QR code (see Figure 1). This can make collecting data especially easy, as long as you make the form available to anyone (not requiring authentication).  Keep in mind, though, that not all of your students may have a phone that can read QR codes.  Making the link available in several ways may be the most effective strategy.

It’s also worth noting that there is a tricky bug in Microsoft Forms that causes problems when working with numerical data  (see the section Working with Data below).  Although there is a workaround, I suggest using Google Forms if you can instead of Microsoft Forms, at least until this bug is fixed.

Creating a Form

Open Office 365 (for example, by going to www.newpaltz.edu and pulling down the “Resources” menu at the upper right) which will start you in the Outlook email App.  Click on the App Menu icon in the upper left corner (some say it looks like a waffle):

Figure 2. Office 365 App Menu (the “waffle”).

When the App Menu opens up, click on the icon for the “Forms” App:

Figure 3: Click on the “Forms” icon.

The page that opens up will show you any forms you have already created. To create a new form, click on the downward chevron (“v”) next to “+ New Quiz” to reveal the menu item to create a new data input form.  (A Quiz, in contrast, lets you add the correct answers to the questions and have the quiz scored for you automatically.)

Figure 4: How to create a new form.

A new page opens to let you edit the new form.  First, enter a title for the form, and a description or instructions to be displayed under the title:

Figure 5: Form title and description/instructions.

Then press the “+ Add New” button to create a new question.   At the bottom right of the new question are three dots, “…” to open a menu of options.  Adding a subtitle lets you add more text to the question (such as specifying the units or giving a reminder about something):

Figure 6: Adding a subtitle, and requiring a numerical

Selecting “Restriction” lets you require that the response be a number (or more specific restrictions on the value of the number).  But see the section Working with the Data below for a caveat.

Use the “+ Add new” button to add as many questions as you need.

You can test your form with the “Preview” button at the top of the screen.

Figure 7: Preview button to try out your form.

(Note that you can also use the “Theme” link next to “Preview” to apply a pre-made design theme to your form, or to apply your own customization.)

To exit the preview there is a “<- Back” button at the top of the page.

Viewing the Data

As you test your form the data you enter will show up in a spreadsheet.  To view the data switch from the Questions tab above the form to the Responses tab:

Figure 8: Responses tab and link to the data.

Click on the “Open in Excel” link to view and work with your collected data using Microsoft Excel.  If you are logged in to Office 365 in your browser then Excel will open in a browser tab or window.  If not, the file will be downloaded to your computer and opened with Excel.

Once you open the spreadsheet you will see that there are columns which show the time the respondent began filling out the form, the time they pressed the submit button, and their email address and name if they were authenticated.  If you don’t want this extra information visible, if only because it clutters up the screen while you are working with the data, you can select a column or columns, right-click on the top (or control-click on a Mac) and select “Hide Columns.”   If you are going to share the data file with students and don’t want them to have the hidden data then you will need to actually delete the columns, not just hide them.


Publishing the Form

To collect data from students (or anyone else) you need to give them a link to the form. To do so, click on the “Share” button at the top of the form page, just to the right of the “Preview” and “Theme” links (see Figure 7).  A tool will open from the right of the screen:

Figure 10: Menu to share the form via a web link (URL).

First, select who can view the form. If you select “Anyone can respond” then students won’t have to authenticate to fill out the form, and in fact it will be very easy for them to answer most questions using their phone.  (The exception is a question requiring a long answer, though some students can type on a phone quite fast with their thumbs.)  To account for this, the first question on your form can be to ask for their name or nickname. And if you choose not to ask their name as a question on the form, and they have not authenticated, then all responses will be anonymous, which may be desirable in some cases.

Check the box for a short URL if you will share the link with your class by writing it on the white board or sharing it via a projector for them to type in.  Press the “Copy” button to store the link in your clipboard, and then paste it into a message you send to your students, either by email, or by adding a link to your Blackboard page, or whatever works easiest for you and your students.

The four circular buttons at the bottom of Figure 9 let you select one of four different ways to distribute the link to the Form. The default, shown in Figure 9, is to let you copy the URL and paste it somewhere else.  The second lets you create a QR code for the link, which you could display in class or on Blackboard on in a document, and students can then scan it with a phone to go to the Form. The third button will create HTML code that can be embedded into a web page.  The last one lets you sent the link via e-mail,

In any case, following that link will take your students to a page (unless they have to authenticate first) where they can answer the questions on the form.

Moving the Data File

By default,  the data file associated with a form is (or seems to be) stored in the Shared Documents folder for your Department or Team. That’s fine, especially if the form is shared between several instructors in the department.  But if you want to move the file to your own file storage area then the easiest way to do so is to open the data file and click on the downward chevron “v” next to the word “Saved” right after the name of the file, which will open a menu to rename and/or move the file:

Figure 9: menu to rename and/or move the data file.

Under “Location” you will see where the data file currently lives, and you can press the “>” button to change the name of the file, or move the file to a new location (or both).  For example, you would probably want to move it to a folder under “My Files” for the class for which you are collecting the data.

Sharing the Data File

Since the data are stored in an Excel spreadsheet in OneDrive you can share it the same way you would share any document from OneDrive.  When you share it, you can specify if the person you are sharing with can edit the file, or only read it.  The easiest way to share the spreadsheet is to open the file and click on “Share” at the top of the page:

Figure 11: How to share the spreadsheet with someone else.

You can either share by entering the email of the person you wish to share with, or you can copy a link and then paste it into a message you send to them by whatever means you find convenient.

One interesting way to use this is to have one instructor create the form and then share it to another instructor to collect and view the data from that instructor’s class. If editing permission is granted then the second instructor can use the spreadsheet in class just as if they had created it.  At the end of the class the spreadsheet can be cleared (perhaps after copying it) to prepare for the subsequent class.

Working with the Data

Once you have collected the data into a spreadsheet you can do just about anything you could do with data from any source using a spreadsheet, with one big exception:  numerical data are not actually numerical.

There is a tricky bug in Microsoft Forms where even if you specify that the value to be entered into the form must be a number, it is recorded in the spreadsheet as a character string.  This isn’t obvious, because the values in the columns of the spreadsheet will look like numbers.  You can only see that they are not numbers if you click on a cell and then inspect the contents in the Formula bar near the top of the page; the value will have an apostrophe in front of it, which tells Excel to treat it as text rather than as a number.  (This is how you can keep a leading zero on a zip code.)

The problem with this is that it gets in the way of applying statistical or trig functions to the data.  Figure 12 shows what should be a valid operation in Excel, but Figure 13 shows the result when you press Enter.

The function acts as if it had received no numerical data, because the values in the column above are actually text, not numbers.

There are several workarounds to this.  Perhaps the easiest is to multiply the range in the function call by one, by inserting “*1” in the range.  Doing simple multiplication on the values in the column still works and produces numbers, which can then be used by a function.  So in place of the formula in Figure 12 one would write:

Figure 14: Multiplying the range passed to the function by 1 is a simple workaround.

Another option is to try to remove the apostrophes from all the data, as described here1 and here,2 but that can be a little more difficult to manage on the fly during a class.

This bug has apparently been in Microsoft Forms since at least the Fall of 2019.3  Until Microsoft fixes this, I see nothing wrong — when demonstrating this in front of a class — with explaining that the extra “*1” is needed because Microsoft has not yet fixed their crappy code after several years.4 One could also mention that this is not a problem with Google Forms.

There is another bug you may want to be aware of, if you will reuse the form for more than one class or class section.  The button to “Delete all responses” does not work:

Figure 15: Button to reset the form by deleting all responses (but as of Spring 2022 this does not work).

It will reset the count of responses, but it does not delete data from the spreadsheet. If you really want to reset the form by deleting old data then you will have to go into the spreadsheet and delete the previous data manually.

Notes

  1. How to remove leading apostrophe from numbers in Excel?  https://www.extendoffice.com/documents/excel/2868-excel-remove-leading-apostrophe.html
  2. How to Remove Apostrophe in Excel (3 Easy Ways)  https://spreadsheetplanet.com/remove-apostrophe-in-excel/
  3. Responses changing from number to text, Microsoft Tech Forums, https://techcommunity.microsoft.com/t5/microsoft-forms/responses-changing-from-number-to-text/m-p/832617
  4. My hope is that doing so publicly will prod them to fix this.

New Paltz CAS 2FA and Windows SSO don’t play nice together in Firefox

New Paltz CAS 2FA and Windows SSO don’t play nice together in Firefox

CAS is the Central Authentication Service for our campus.  Whenever you log in to a service CAS is used to either check that you have already been properly authenticated or to have you authenticate, including two-factor authentication (2FA) using Duo.

Windows SSO (Single Sign-On) is a similar mechanism for allowing you to connect to various on-line services using your Microsoft Windows account.  The Firefox browser has recently added support for Windows SSO for Windows 101 (as of Version 91 from August 10, 2021).

Unfortunately CAS seems to fail when using Firefox with Windows SSO support turned on.  The result is the warning you get at the top of this page.   The solution is to turn off Windows SSO support.  To do so, pull down “Settings” from the “hamburger” icon in upper left corner, select “Privacy & Security” and then uncheck the box where it says “Allow Windows single sign-on for Microsoft, work, and school accounts”.  The result should look like this:

Now you should have no problem authenticating to CAS.

Update – January 2022

In mid January 2022 the problem returned when I updated to Firefox version 96.0.1.  On MacOS 12.1 (Monterey) the checkbox mentioned above is no longer there.  On Windows 10 it’s there, but unchecking it does not solve the problem.

Our campus documentation suggests clearing all cookies, which of course has consequences far outside of just the one website I’m trying to visit.  I found that deleting all cookies from just the domain microsoftonline.com fixed the problem.

Notes

Skip to toolbar