This article provides configuration information for using an in-classroom document camera so that the content it displays is available to both students in the classroom and those joining via video meeting software (such as Blackboard Collaborate Ultra). These instructions are particular to our Physics Labs, but the general idea should apply more widely. (1050 words)
Introduction and Motivation
The COVID-19 pandemic caused all instruction at SUNY New Paltz to move online in March 2020, after an extended Spring Break. If we are able to have students in the classroom in Fall 2020 they will likely be required to wear masks and to be spread out in the classroom to preserve “social distancing.” Spreading everyone out in a classroom may pose problems — in some cases it just won’t be possible to have all enrolled students in the same room if they have to all be at least 2 meters away from each other.
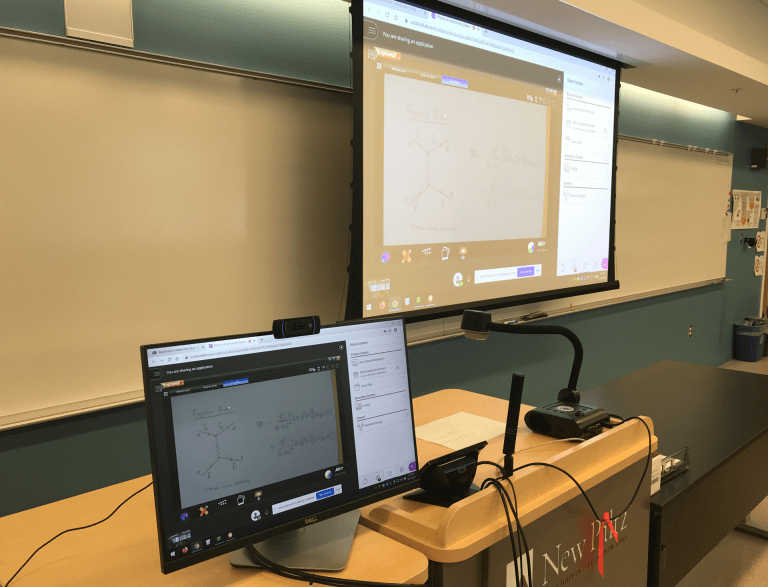
One way to deal with this is what I will call “local+remote,” which means a synchronous class or activity where some students are physically in the classroom and others join via computer, all at the same time. Students observing or participating remotely might watch via a classroom lecture capture camera (we have these in our physics labs) or a webcam, or maybe even a “nanny cam”. The particular mode I consider here is that the instructor presents their content using a document camera, and that content is both displayed on the projection screen in the classroom and is shared with remote participants using video meeting software (such as Blackboard Collaborate Ultra).
The instructions presented here apply to the AVer F50-8M document cameras found in the Physics Labs in Science Hall at SUNY New Paltz, used with Blackboard Collaborate Ultra. This model of document camera is also used in other classrooms in Science Hall, but classrooms in other buildings may be different. Even so, the general idea may still work with other document cameras. If you are unsure, ask Instructional Technology Services for assistance, and try everything well before your class starts.
Cable Required
To make this work in our labs required an additional cable connecting the AVer document camera to the computer. This cable connects to the document camera with USB-mini B, and connects to the computer via standard USB-A (what most people think of as “regular USB”). Actually, in our labs the cable from this additional cable from the document camera connects to a USB-A extension cable, which then connects to the computer. In SH 157 and SH 159 the extension cable is already routed through the internals of the instructor station from the back of the computer and up through a hole in the desk. In SH 160 the extension cable is currently external
To use this kind of document camera in any other classroom you will need both these extra cables. Why? The video from the document camera normally comes out of the HDMI port to the Crestron system to be routed directly to the projector, bypassing the computer. The USB-mini B cable takes video output from the document camera to the computer, but the distance from the document camera to the front of the computer is far enough that you likely also need an extension cable (we did).
Also note, not all classrooms on campus have the same make and model of document camera, so you should confirm which kind of cable is actually needed before assuming another classroom is just like our physics labs. Test everything before you teach your class, and ask Instructional Technology Services for assistance.
Classroom Setup
- To begin, turn on the document camera (press the power button). It takes a while for it to wake up and be recognized by the computer, so do this first. Verify that the USB cable is plugged in to the back, and (if you can tell) connects the document camera to the computer.

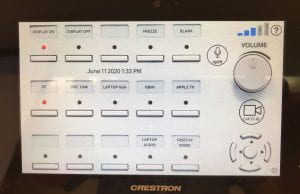
Figure 1. Crestron A/V control panel with the Display “ON” and “PC” selected as the video source. - Next, wake up the A/V control panel by touching the screen, and then turn on the projection system by pressing the “DISPLAY ON” button (see Fig. 1). This should cause the projection screen to drop from the ceiling. Select “PC” as the source for the classroom projection system.
- Plug it your external webcam (if you have one1) and position it so that your students will be able to see you while you are teaching.
- Turn on the computer and log in, then start a browser (Chrome is recommended over Firefox2— at least for now).
- Then start the video meeting, using Blackboard Collaborate Ultra. When you are starting the meeting you will configure your audio and video. Pay attention here to your choices, because you will be able to select either the webcam or the document camera as the video source, and when you start the meeting you will want the wecam (if there is one). You might prefer the document camera as the audio source, since you’ll be speaking nearer to it than the webcam once you are presenting from it.
- In the video meeting, open the control panel on the right (using the purple left-chevron icon shown in Fig. 2) and select the “sharing” menu (the icon shown in Fig. 3). From the sharing menu select Share Camera. You will then be given the choice to select either the webcam or the document camera. The
- Teach your class using just the document camera to present equations and drawings and other visual content, and both local and remote students can see it, and hear you, and see you.

Audio Headset
To be able to hear students who are remote you will likely need a headset, but to be able to hear students in the room you will want to keep one ear uncovered. One way to accomplish this is to use ear buds with only one of them in your ear (the one with the microphone). This has the advantage of getting the microphone closer to your mouth.
Perhaps even better is to get a “Truckers” bluetooth headset, which can connect to the computer wirelessly, has a boom mike, and a speaker for only one ear (since truckers need to keep one ear uncovered for safety). Most let you use either ear.
Either way, you will have to configure the computer to use ear buds or the bluetooth headset for audio input and output (documentation forthcoming). Be sure to test this before you teach your first class.
Notes and References
- It is possible to teach using just the document camera but not a webcam, but then your students won’t be able to see you, only the image from the webcam. If you don’t have an external webcam, the AVer F50-8M has a built-in microphone, so you will not need an extra microphone ↩
- Firefox has problems sharing an application window (not the whole screen) in Blackboard Collaborate Ultra. NEED TO TEST THIS WITHOUT USING SPHERE2! Sharing a single application window with Chrome had no problems. Microsoft Edge has not yet been tested. ↩

