
An on-line form can be an easy way to collect data from students during a lab or class, and with the data automatically loaded into a spreadsheet it can then be straighforward to work with the data immediately. Google Forms is one way to do this, but since SUNY New Palz is moving to the Microsoft Office 365 suite of tools we need to know how to do this in Office 365. This article gives you enough information to get started, and those who are already familiar with Google Forms will see a lot of similarity. This kind of form can also be used to give a quiz or perform a survey (though there may be better tools for that).

It’s worth noting that students can even enter data from a mobile device once you give them the link to the form, and there are several ways to easily distribute the link, including displaying a QR code (see Figure 1). This can make collecting data especially easy, as long as you make the form available to anyone (not requiring authentication). Keep in mind, though, that not all of your students may have a phone that can read QR codes. Making the link available in several ways may be the most effective strategy.
It’s also worth noting that there is a tricky bug in Microsoft Forms that causes problems when working with numerical data (see the section Working with Data below). Although there is a workaround, I suggest using Google Forms if you can instead of Microsoft Forms, at least until this bug is fixed.
Creating a Form
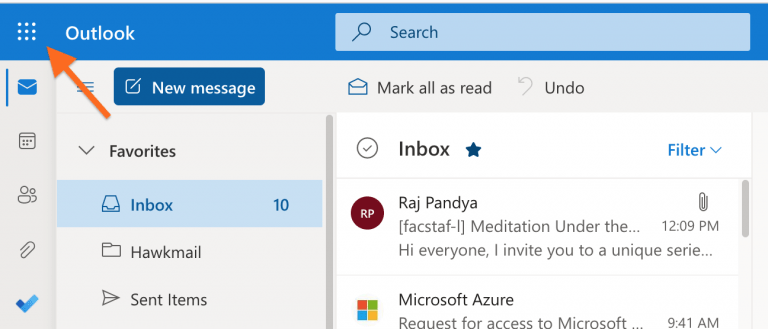
Open Office 365 (for example, by going to www.newpaltz.edu and pulling down the “Resources” menu at the upper right) which will start you in the Outlook email App. Click on the App Menu icon in the upper left corner (some say it looks like a waffle):
When the App Menu opens up, click on the icon for the “Forms” App:

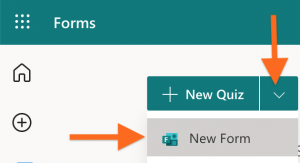
The page that opens up will show you any forms you have already created. To create a new form, click on the downward chevron (“v”) next to “+ New Quiz” to reveal the menu item to create a new data input form. (A Quiz, in contrast, lets you add the correct answers to the questions and have the quiz scored for you automatically.)
A new page opens to let you edit the new form. First, enter a title for the form, and a description or instructions to be displayed under the title:

Then press the “+ Add New” button to create a new question. At the bottom right of the new question are three dots, “…” to open a menu of options. Adding a subtitle lets you add more text to the question (such as specifying the units or giving a reminder about something):

Selecting “Restriction” lets you require that the response be a number (or more specific restrictions on the value of the number). But see the section Working with the Data below for a caveat.
Use the “+ Add new” button to add as many questions as you need.
You can test your form with the “Preview” button at the top of the screen.

(Note that you can also use the “Theme” link next to “Preview” to apply a pre-made design theme to your form, or to apply your own customization.)
To exit the preview there is a “<- Back” button at the top of the page.
Viewing the Data
As you test your form the data you enter will show up in a spreadsheet. To view the data switch from the Questions tab above the form to the Responses tab:
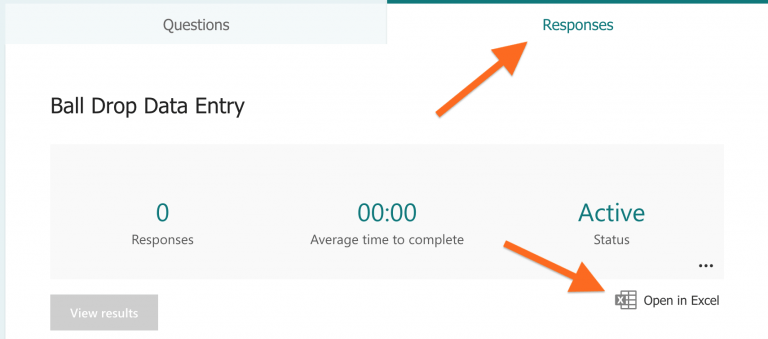
Click on the “Open in Excel” link to view and work with your collected data using Microsoft Excel. If you are logged in to Office 365 in your browser then Excel will open in a browser tab or window. If not, the file will be downloaded to your computer and opened with Excel.
Once you open the spreadsheet you will see that there are columns which show the time the respondent began filling out the form, the time they pressed the submit button, and their email address and name if they were authenticated. If you don’t want this extra information visible, if only because it clutters up the screen while you are working with the data, you can select a column or columns, right-click on the top (or control-click on a Mac) and select “Hide Columns.” If you are going to share the data file with students and don’t want them to have the hidden data then you will need to actually delete the columns, not just hide them.
Publishing the Form
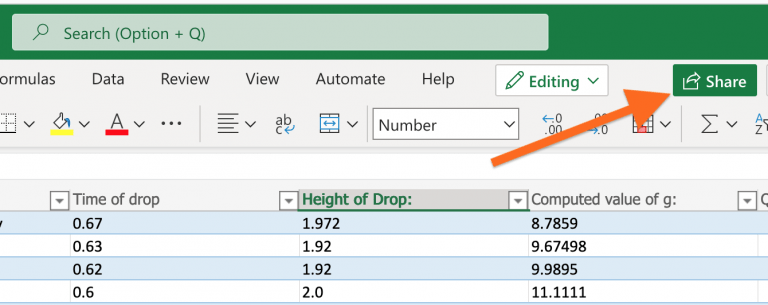
To collect data from students (or anyone else) you need to give them a link to the form. To do so, click on the “Share” button at the top of the form page, just to the right of the “Preview” and “Theme” links (see Figure 7). A tool will open from the right of the screen:

First, select who can view the form. If you select “Anyone can respond” then students won’t have to authenticate to fill out the form, and in fact it will be very easy for them to answer most questions using their phone. (The exception is a question requiring a long answer, though some students can type on a phone quite fast with their thumbs.) To account for this, the first question on your form can be to ask for their name or nickname. And if you choose not to ask their name as a question on the form, and they have not authenticated, then all responses will be anonymous, which may be desirable in some cases.
Check the box for a short URL if you will share the link with your class by writing it on the white board or sharing it via a projector for them to type in. Press the “Copy” button to store the link in your clipboard, and then paste it into a message you send to your students, either by email, or by adding a link to your Blackboard page, or whatever works easiest for you and your students.
The four circular buttons at the bottom of Figure 9 let you select one of four different ways to distribute the link to the Form. The default, shown in Figure 9, is to let you copy the URL and paste it somewhere else. The second lets you create a QR code for the link, which you could display in class or on Blackboard on in a document, and students can then scan it with a phone to go to the Form. The third button will create HTML code that can be embedded into a web page. The last one lets you sent the link via e-mail,
In any case, following that link will take your students to a page (unless they have to authenticate first) where they can answer the questions on the form.
Moving the Data File
By default, the data file associated with a form is (or seems to be) stored in the Shared Documents folder for your Department or Team. That’s fine, especially if the form is shared between several instructors in the department. But if you want to move the file to your own file storage area then the easiest way to do so is to open the data file and click on the downward chevron “v” next to the word “Saved” right after the name of the file, which will open a menu to rename and/or move the file:
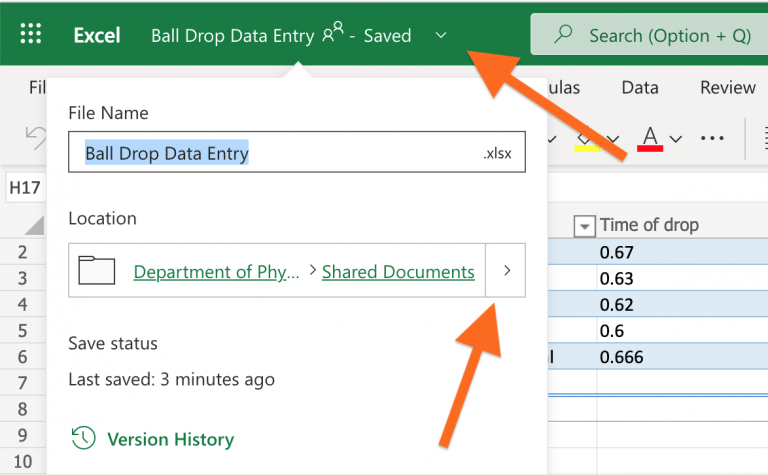
Under “Location” you will see where the data file currently lives, and you can press the “>” button to change the name of the file, or move the file to a new location (or both). For example, you would probably want to move it to a folder under “My Files” for the class for which you are collecting the data.
Sharing the Data File
Since the data are stored in an Excel spreadsheet in OneDrive you can share it the same way you would share any document from OneDrive. When you share it, you can specify if the person you are sharing with can edit the file, or only read it. The easiest way to share the spreadsheet is to open the file and click on “Share” at the top of the page:
You can either share by entering the email of the person you wish to share with, or you can copy a link and then paste it into a message you send to them by whatever means you find convenient.
One interesting way to use this is to have one instructor create the form and then share it to another instructor to collect and view the data from that instructor’s class. If editing permission is granted then the second instructor can use the spreadsheet in class just as if they had created it. At the end of the class the spreadsheet can be cleared (perhaps after copying it) to prepare for the subsequent class.
Working with the Data
Once you have collected the data into a spreadsheet you can do just about anything you could do with data from any source using a spreadsheet, with one big exception: numerical data are not actually numerical.
There is a tricky bug in Microsoft Forms where even if you specify that the value to be entered into the form must be a number, it is recorded in the spreadsheet as a character string. This isn’t obvious, because the values in the columns of the spreadsheet will look like numbers. You can only see that they are not numbers if you click on a cell and then inspect the contents in the Formula bar near the top of the page; the value will have an apostrophe in front of it, which tells Excel to treat it as text rather than as a number. (This is how you can keep a leading zero on a zip code.)
The problem with this is that it gets in the way of applying statistical or trig functions to the data. Figure 12 shows what should be a valid operation in Excel, but Figure 13 shows the result when you press Enter.

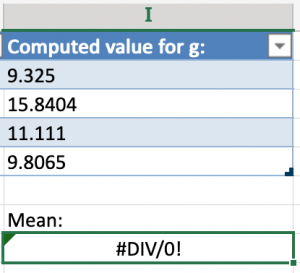
The function acts as if it had received no numerical data, because the values in the column above are actually text, not numbers.
There are several workarounds to this. Perhaps the easiest is to multiply the range in the function call by one, by inserting “*1” in the range. Doing simple multiplication on the values in the column still works and produces numbers, which can then be used by a function. So in place of the formula in Figure 12 one would write:

Another option is to try to remove the apostrophes from all the data, as described here1 and here,2 but that can be a little more difficult to manage on the fly during a class.
This bug has apparently been in Microsoft Forms since at least the Fall of 2019.3 Until Microsoft fixes this, I see nothing wrong — when demonstrating this in front of a class — with explaining that the extra “*1” is needed because Microsoft has not yet fixed their crappy code after several years.4 One could also mention that this is not a problem with Google Forms.
There is another bug you may want to be aware of, if you will reuse the form for more than one class or class section. The button to “Delete all responses” does not work:

It will reset the count of responses, but it does not delete data from the spreadsheet. If you really want to reset the form by deleting old data then you will have to go into the spreadsheet and delete the previous data manually.
Notes
- How to remove leading apostrophe from numbers in Excel? https://www.extendoffice.com/documents/excel/2868-excel-remove-leading-apostrophe.html ↩
- How to Remove Apostrophe in Excel (3 Easy Ways) https://spreadsheetplanet.com/remove-apostrophe-in-excel/ ↩
- Responses changing from number to text, Microsoft Tech Forums, https://techcommunity.microsoft.com/t5/microsoft-forms/responses-changing-from-number-to-text/m-p/832617 ↩
- My hope is that doing so publicly will prod them to fix this. ↩