This page provides steps for listing any event for which you want to give SONA points. The steps here apply to any study and any talk.
Note that this Steps 2 through 6 ALSO explains how researchers can link the SONA Systems and Qualtrics programs so that participants automatically receive points after completing your study. If you are not using Qualtrics for your SONA event (talk or study), then you may skip these steps. We leave them in here rather than duplicating the information elsewhere.
There is a steep learning curve to this. The first time will probably take you 20-30 min. Be patient and trust that the steps work. You will need to toggle between the two programs in the following steps. It may be useful to keep them open in separate windows.
Contents
- Step 1: Get HREB approval for your study and set up your new study on SONA
- Step 2 (Skip if you are not using Qualtrics): Set up your Qualtrics study
- Step 3 (Skip if you are not using Qualtrics): Get your Qualtrics study’s weblink
- Step 4 (Skip if you are not using Qualtrics): Set up your study on SONA Systems
- Step 5 (Skip if you are not using Qualtrics): Link SONA’s details back to Qualtrics
- Step 6 (Skip if you are not using Qualtrics): Check if the automatic point assignment works
- Step 7: Add timeslots for your study
- Step 8: Steps to take once your study is completed
- Step 9: When your study is done
- SONA Central Home
Step 1: Get HREB approval for your study and set up your new study on SONA
If you are setting up a study, follow these steps here:
After HREB approves the study,
- Set up your Study on SONA using the “Add a New Study” link at the top of your Researcher page.
- Submit a PDF of the approval letter.
- Request Approval of your study on SONA. You should get an automated message from SONA to confirm that the PPC has approved your study on SONA.
- Notice that the PPC will not activate your study because you should do this when you are ready to post timeslots. Researchers must activate their own study once they have set up time slots.
If you are setting up a talk, follow these steps here:
- Set up your Study on SONA using the “Add a New Study” link at the top of your Researcher page.
- Fill out this form.
- Follow the prompts to ask for approval on SONA.
- If you do not see your talk get an automated message from SONA to confirm that the PPC has approved your study on SONA, then please fill out this form.
- Skip to Step 7.
Step 2 (Skip if you are not using Qualtrics): Set up your Qualtrics study
- Create the study to your satisfaction.
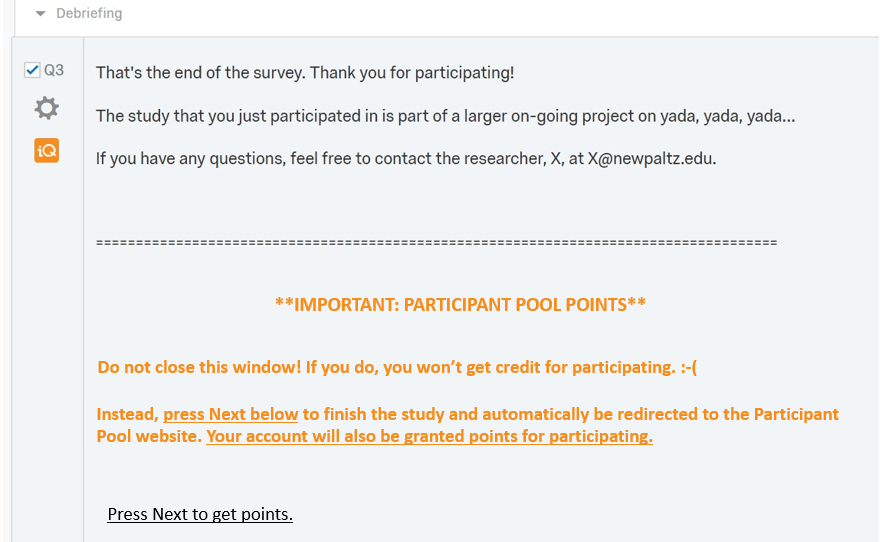
- Automatic point assignment requires that, on the study’s final page, participants press the Next button (or whatever word or icon you choose in Qualtrics to advance screens). Doing so will take participants to the SONA website, which will show that they have been granted points. They will not be granted points if they instead close the browser without pressing that vital Next button. So be sure to instruct participants in a clear, attention- grabbing way to press the Next button to ensure their points are granted. For example:
- Click the green Publish button to activate the survey on Qualtrics.
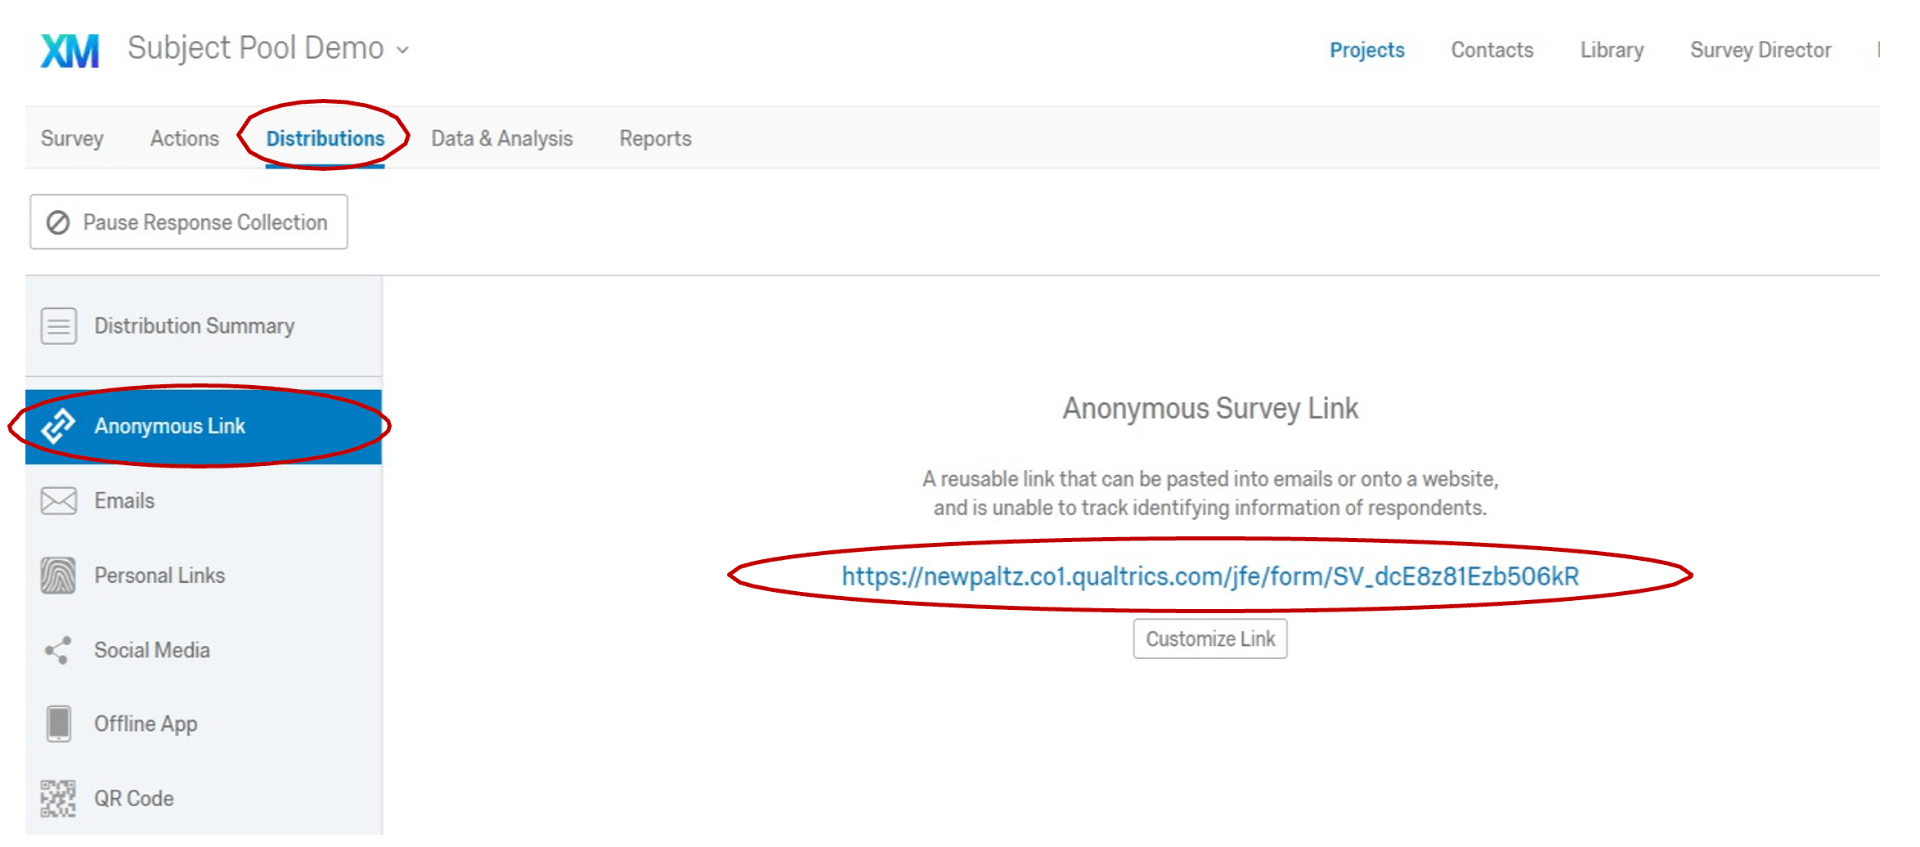
Step 3 (Skip if you are not using Qualtrics): Get your Qualtrics study’s weblink
- Click on the Distributions tab, and then the Anonymous Link option. The weblink will appear in the screen’s center. Copy it onto the clipboard.
Step 4 (Skip if you are not using Qualtrics): Set up your study on SONA Systems
- In SONA, click the Add New Study tab. Then select Online External Study for credit.
- Complete the Basic Study Information fields (e.g., study name, description of your study, HREB Approval code)
- For points, each 30 min block is worth 1 credit. Round up as needed. For example, a 10-min survey is worth 1 credit, a 40-min survey is worth 2 credits, and so on.
- Select any additional researchers (or faculty advisor) from the team, if applicable.
- Click Yes to make the study Active. (The PPC will later mark it as Approved, which is required to make the study available to participants.)
- Select any desired Advanced Settings. These allow you to create pre-requisites or disqualifiers for participation, as well as other options. In nearly all cases, the default options will suffice.
- Paste the Qualtrics study’s weblink into the Study URL box. At the end of the weblink, add “?id=%SURVEY_CODE%” (without the quotation marks). This field is case-sensitive; use correct upper- vs. lower-case throughout the URL. Below is an example; your own web address will be slightly different but will begin with https:newpaltz.co1.qualtrics.com/…

- Click the green Add This Study button at the bottom of the screen. Now the study is in the system (and can be deleted later, if desired).
- A new screen will appear that summarizes your study’s information. In the lower left, you’ll see a field called “Qualtrics Redirect to a URL.” Copy the URL onto your clipboard. This link will be pasted into Qualtrics in the next step.
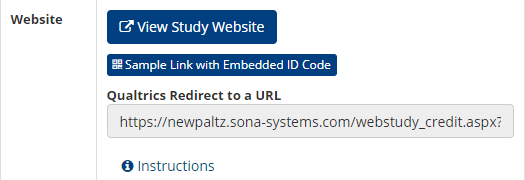
- If you don’t see this “Qualtrics Redirect to a URL” field, it’s because an error occurred when you added the Qualtrics weblink into the Study URL field (p. 2). Most likely, the “?id=%SURVEY_CODE%” part was done incorrectly. To check this, scroll down to the Study Menu and select Change Study Information. Find the Study URL field to identify the problem.
Step 5 (Skip if you are not using Qualtrics): Link SONA’s details back to Qualtrics
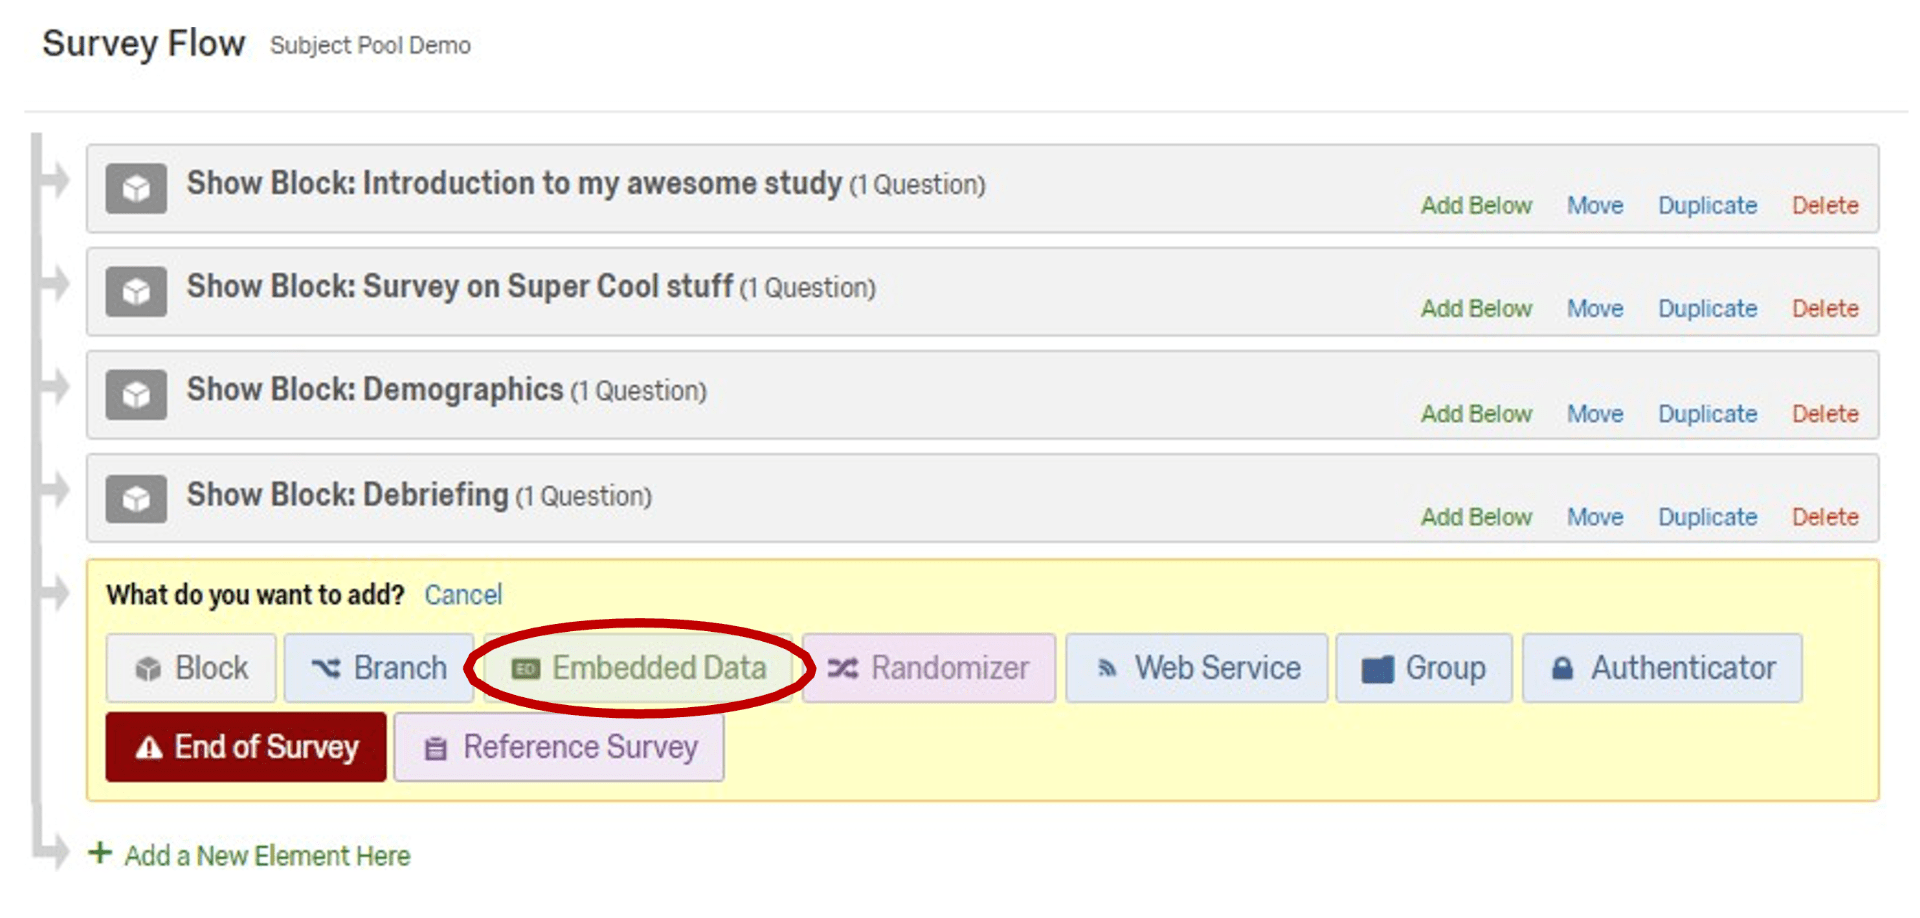
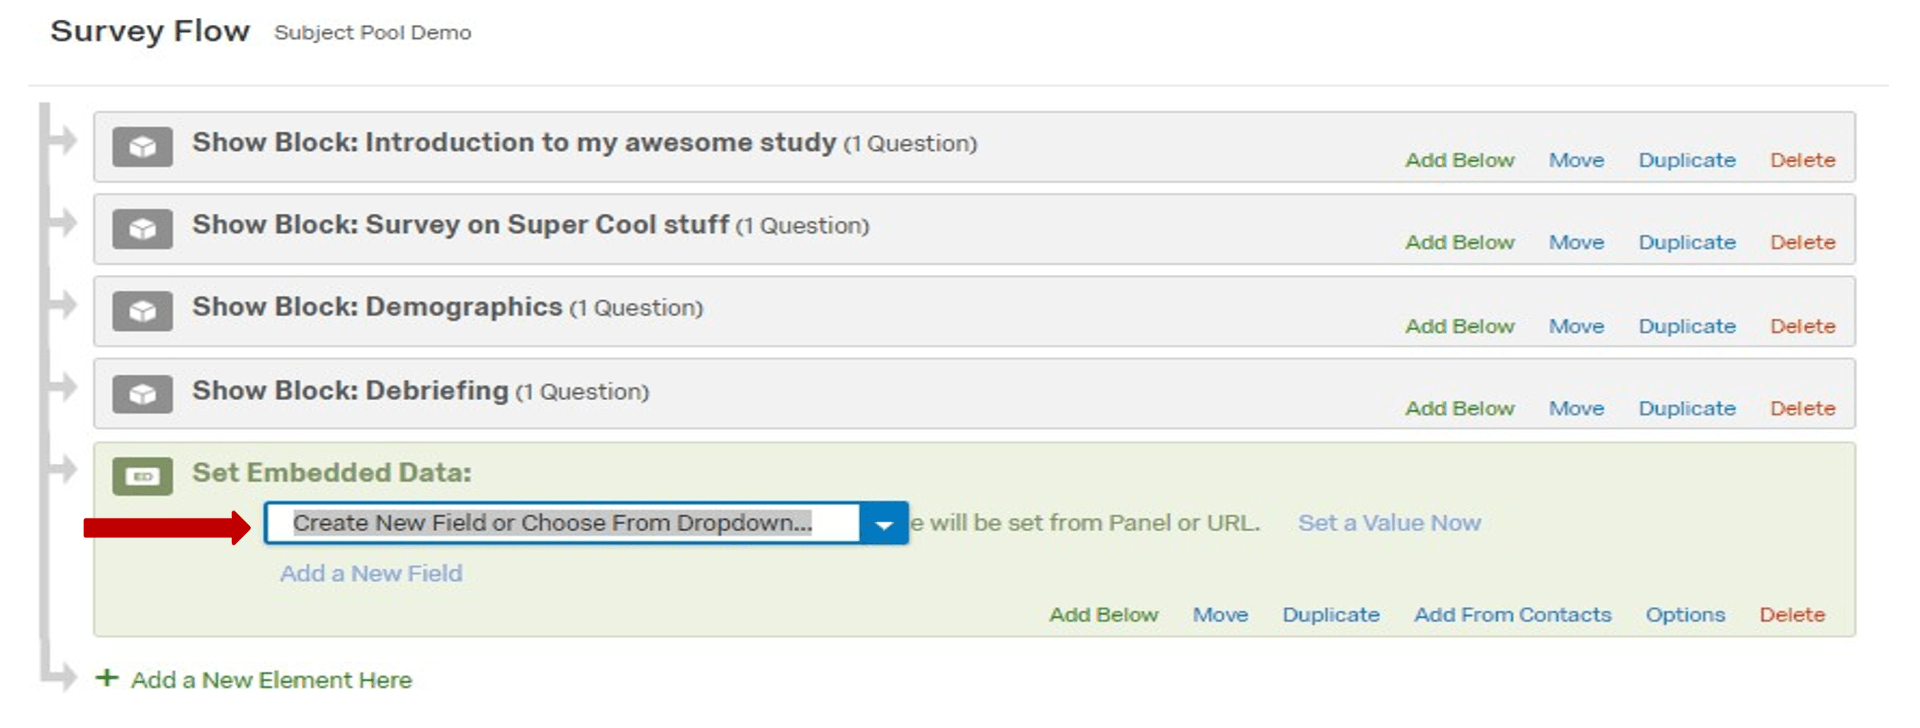
- Returning to your survey in Qualtrics, click on the Survey Flow tab. Then press the Add a New Element Here option at the bottom.

- Then select the Embedded Data option.
- The screen below will appear. Instead of selecting any options from the dropdown menu, just type “id” (lower case, without quotation marks).
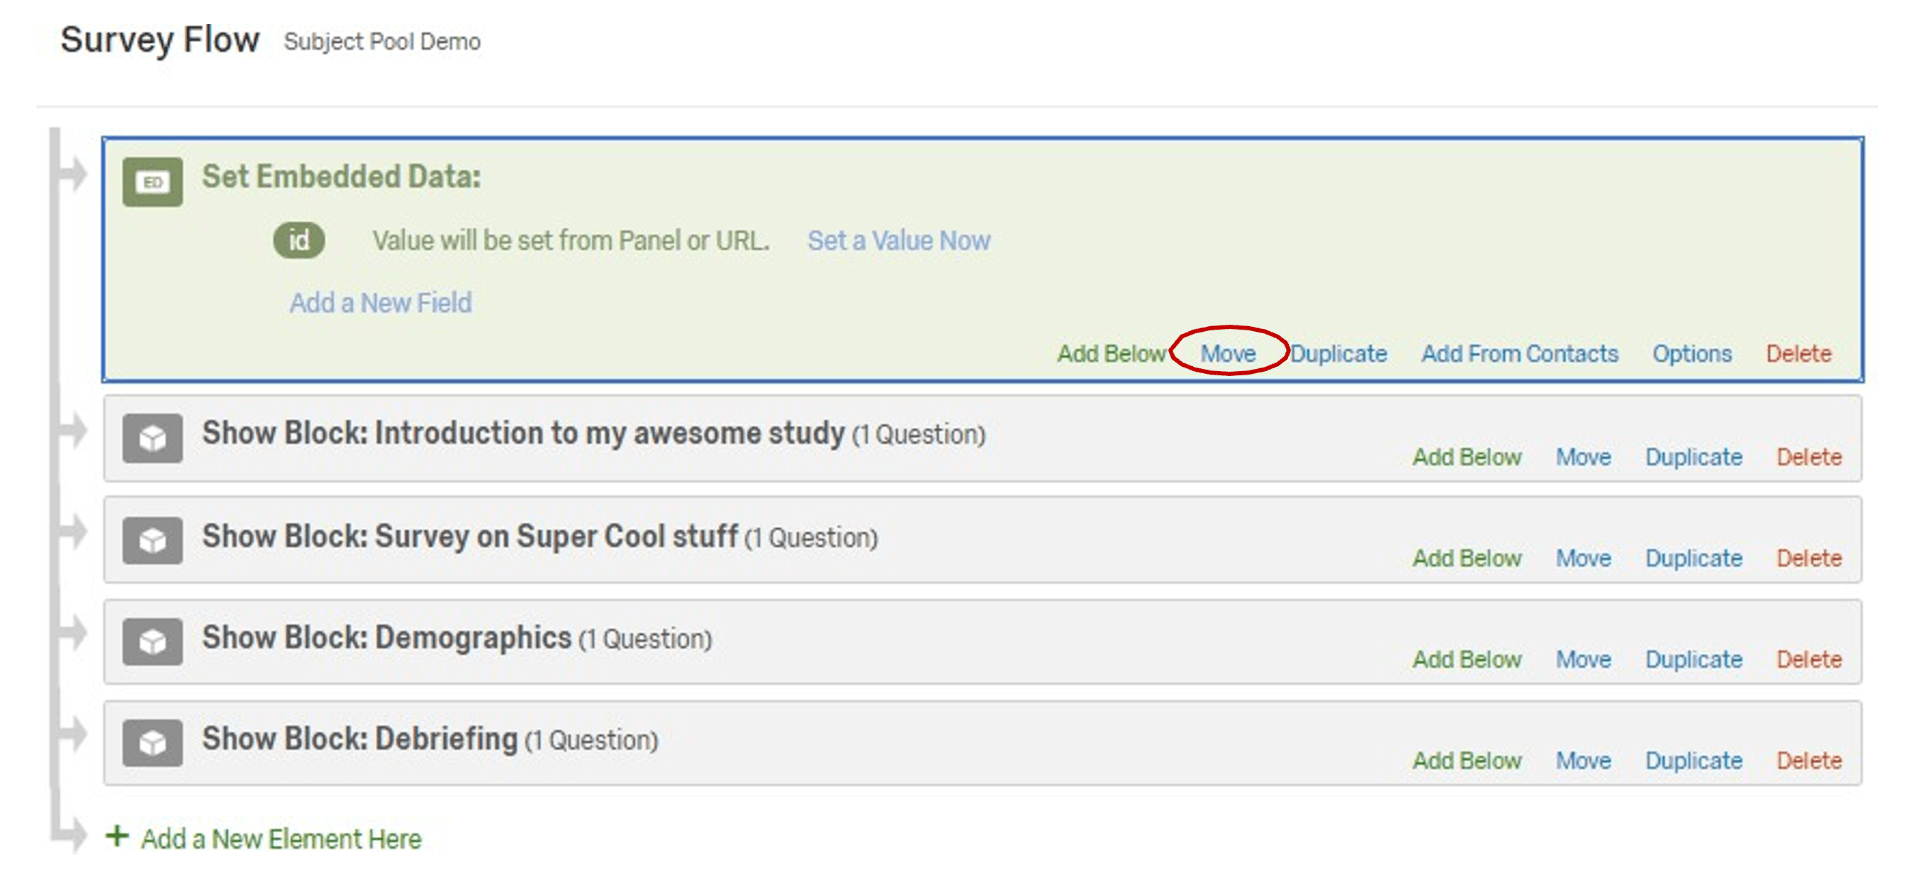
- Click your cursor outside the survey flow box. (If you press the enter key, the program will add a second embedded data field, which is not what you want). The embedded data entry will now say “id”. That is all you need; do not choose to “set a value now.”

- If your study, like this example, has other “blocks,” then place your cursor over the Move link and drag the embedded field to move it to the top of the survey flow. If your study has no other blocks, this embedded field data will already be at the top.
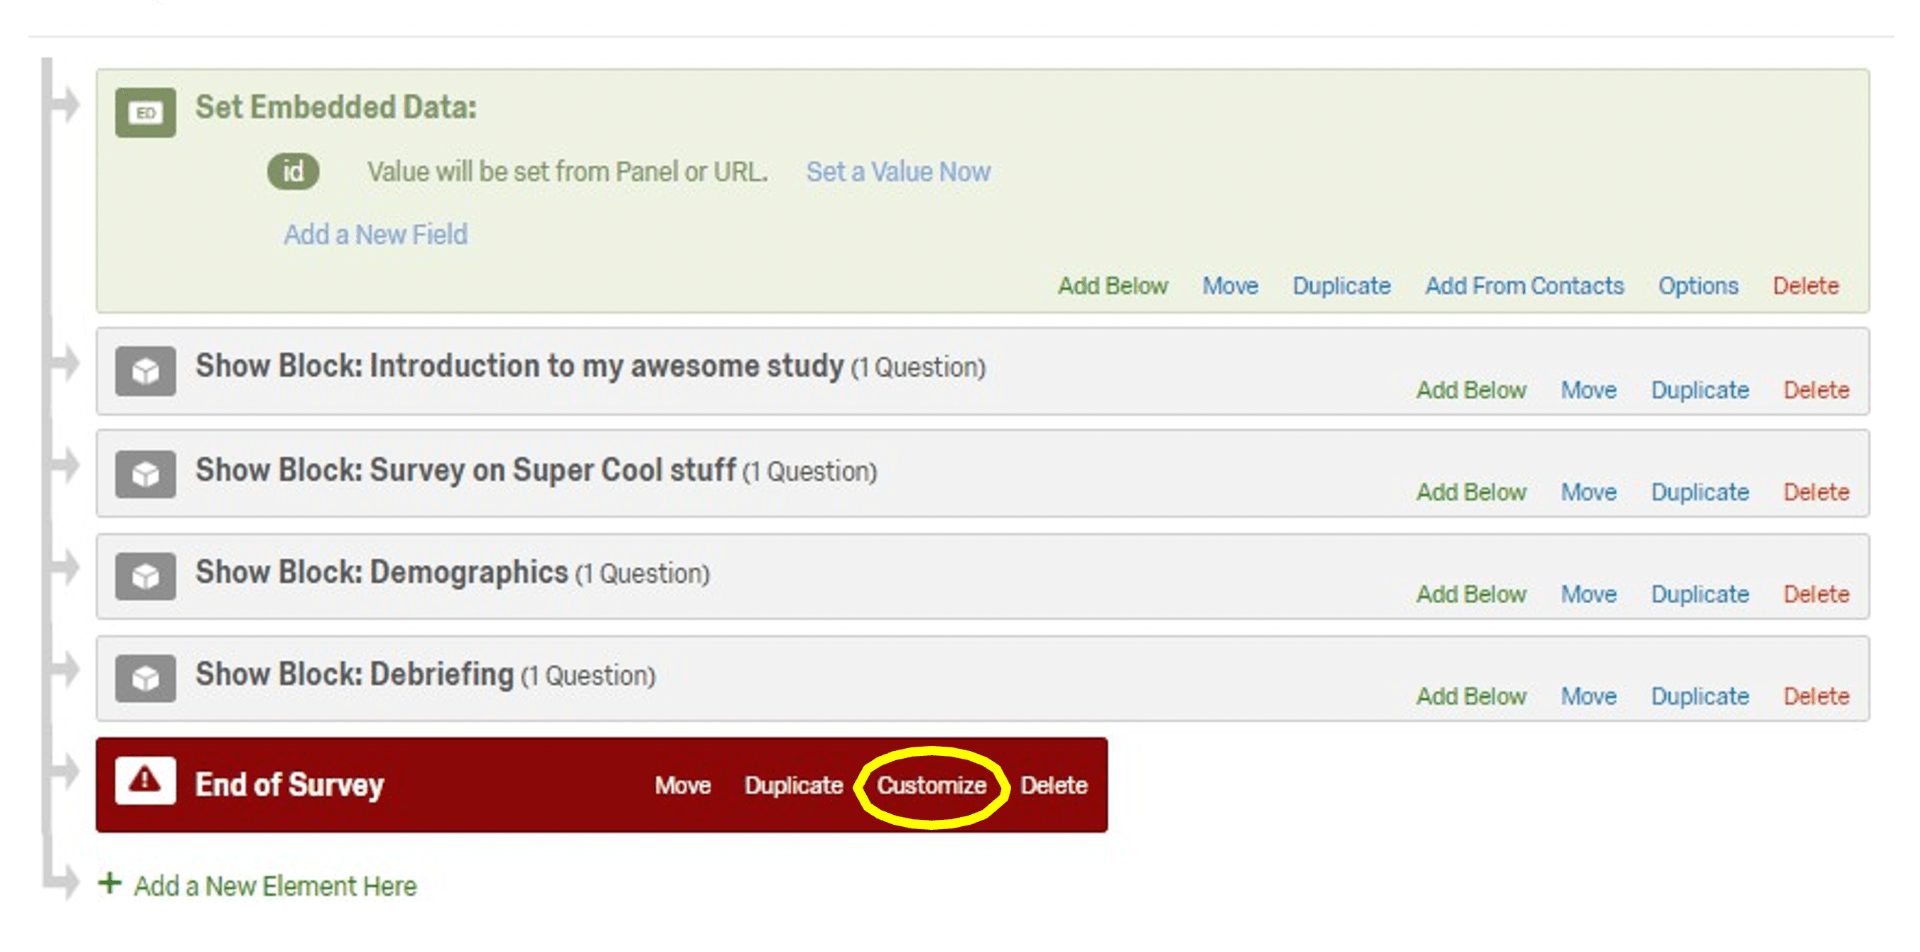
- Now press Add a New Element Here Select the red End of Survey option. Choose the Customize option. Then select the Override Survey Options box.
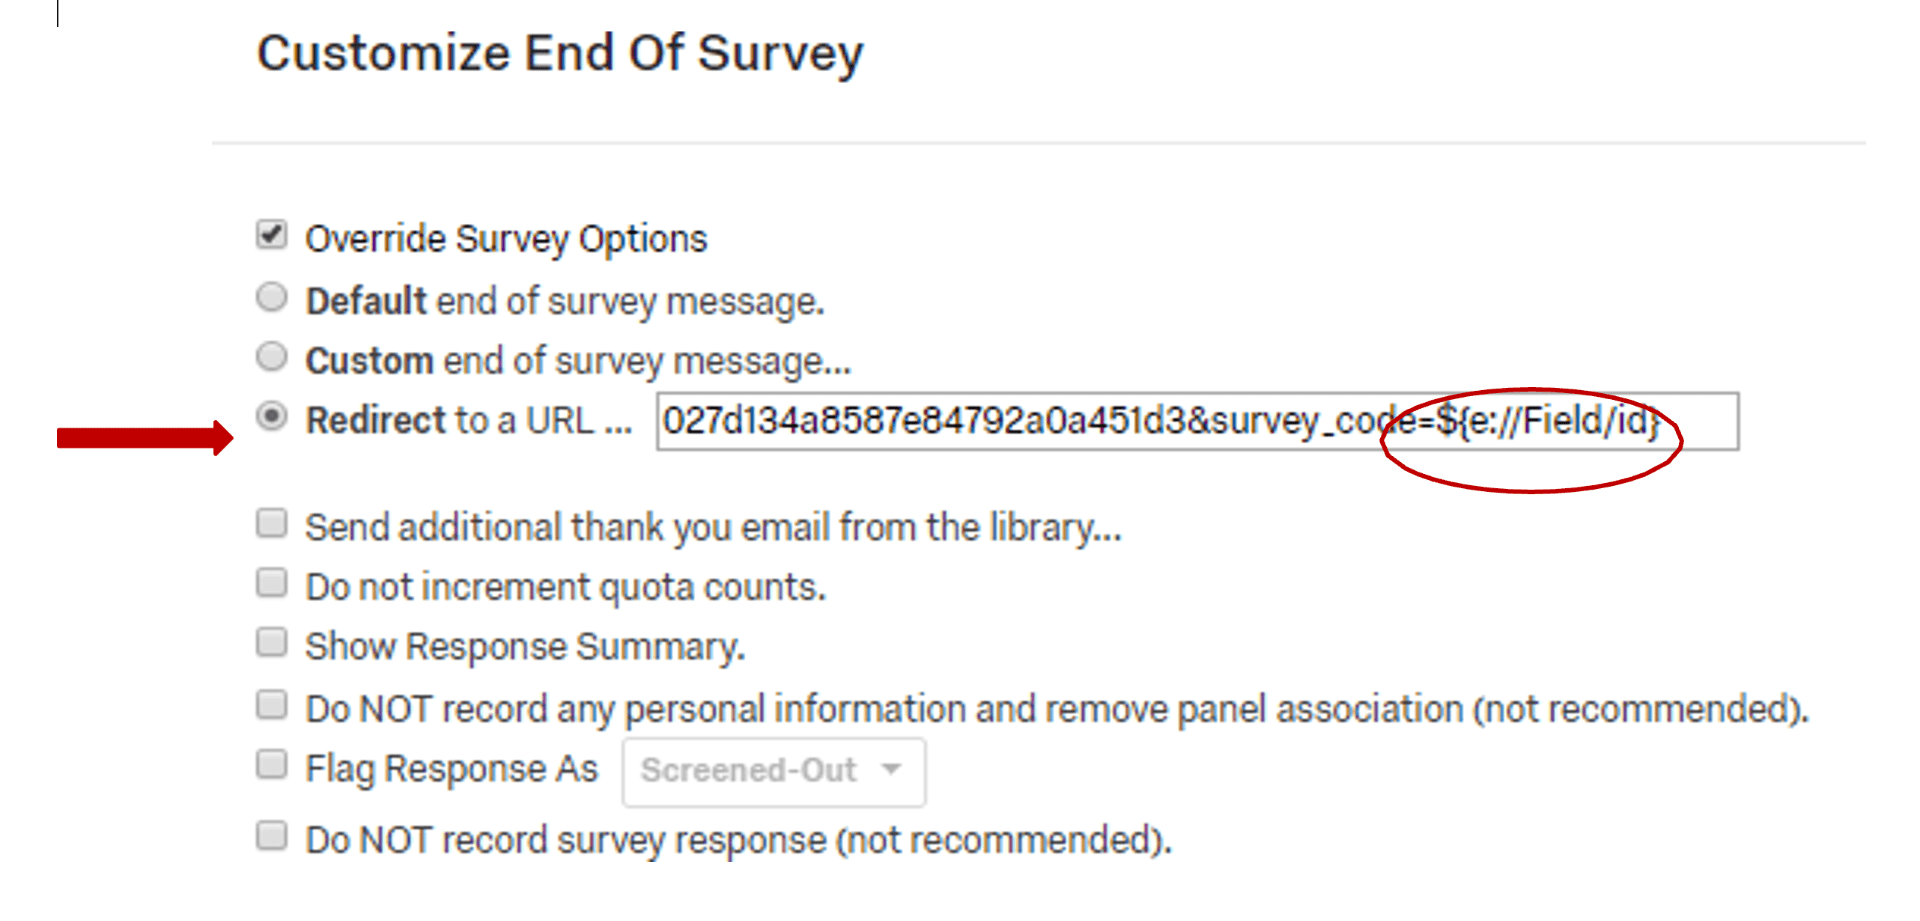
- On the Customize screen, select the Redirect to a URL Paste the SONA-Systems Study Completion URL here (from Step 2, top of p. 2). Double-check that the end of the link’s address has “${e://Field/id}” (without quotes). The link you pasted from SONA should already have this. But if it doesn’t, add it now. This weblink is from SONA; it should begin with “https://newpaltz.sona-systems/com/webstudy” and finish as shown below. If it doesn’t, then you have pasted the incorrect weblink.
- Press OK, and then Save Flow. Then press the green Publish.
Step 6 (Skip if you are not using Qualtrics): Check if the automatic point assignment works
- Before posting timeslots for participants, make sure that the linking This will require that your study is already activated by the PPC (see Step 1).
- On the SONA webpage, open your Click Sample Link with Embedded ID Code.
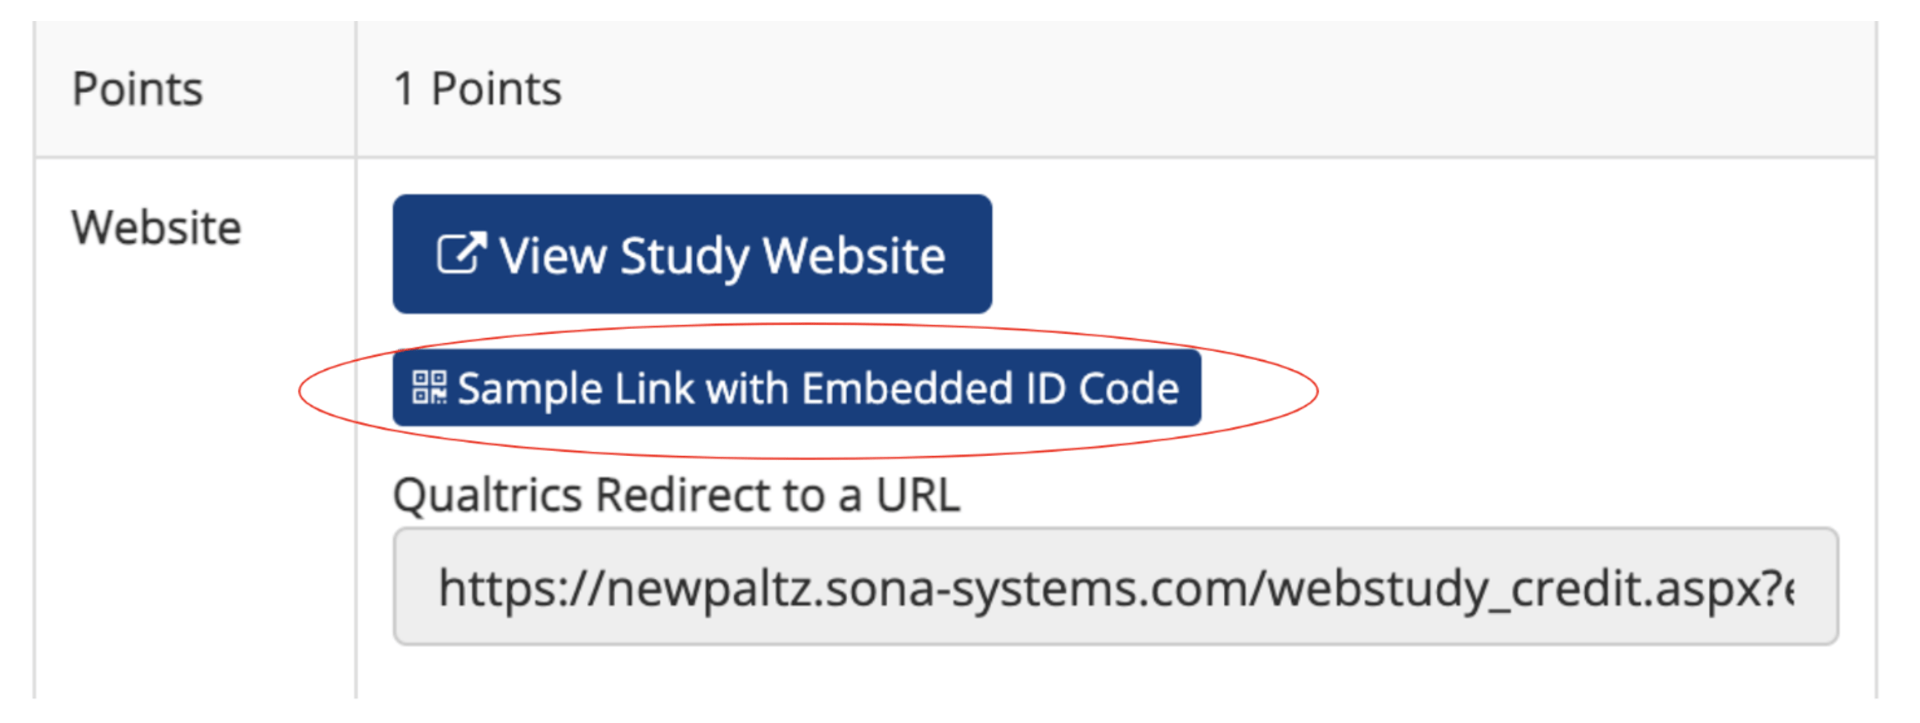
- This should open a new window taking you to your Qualtrics study. Notice the URL at the top of this new page. The end of it should include “id=xxxx”. The xxxx represents the custom id code that SONA-Systems generates for each participant who reserved a spot via the particpant pool; yours says xxxx because you didn’t reserve a timeslot.
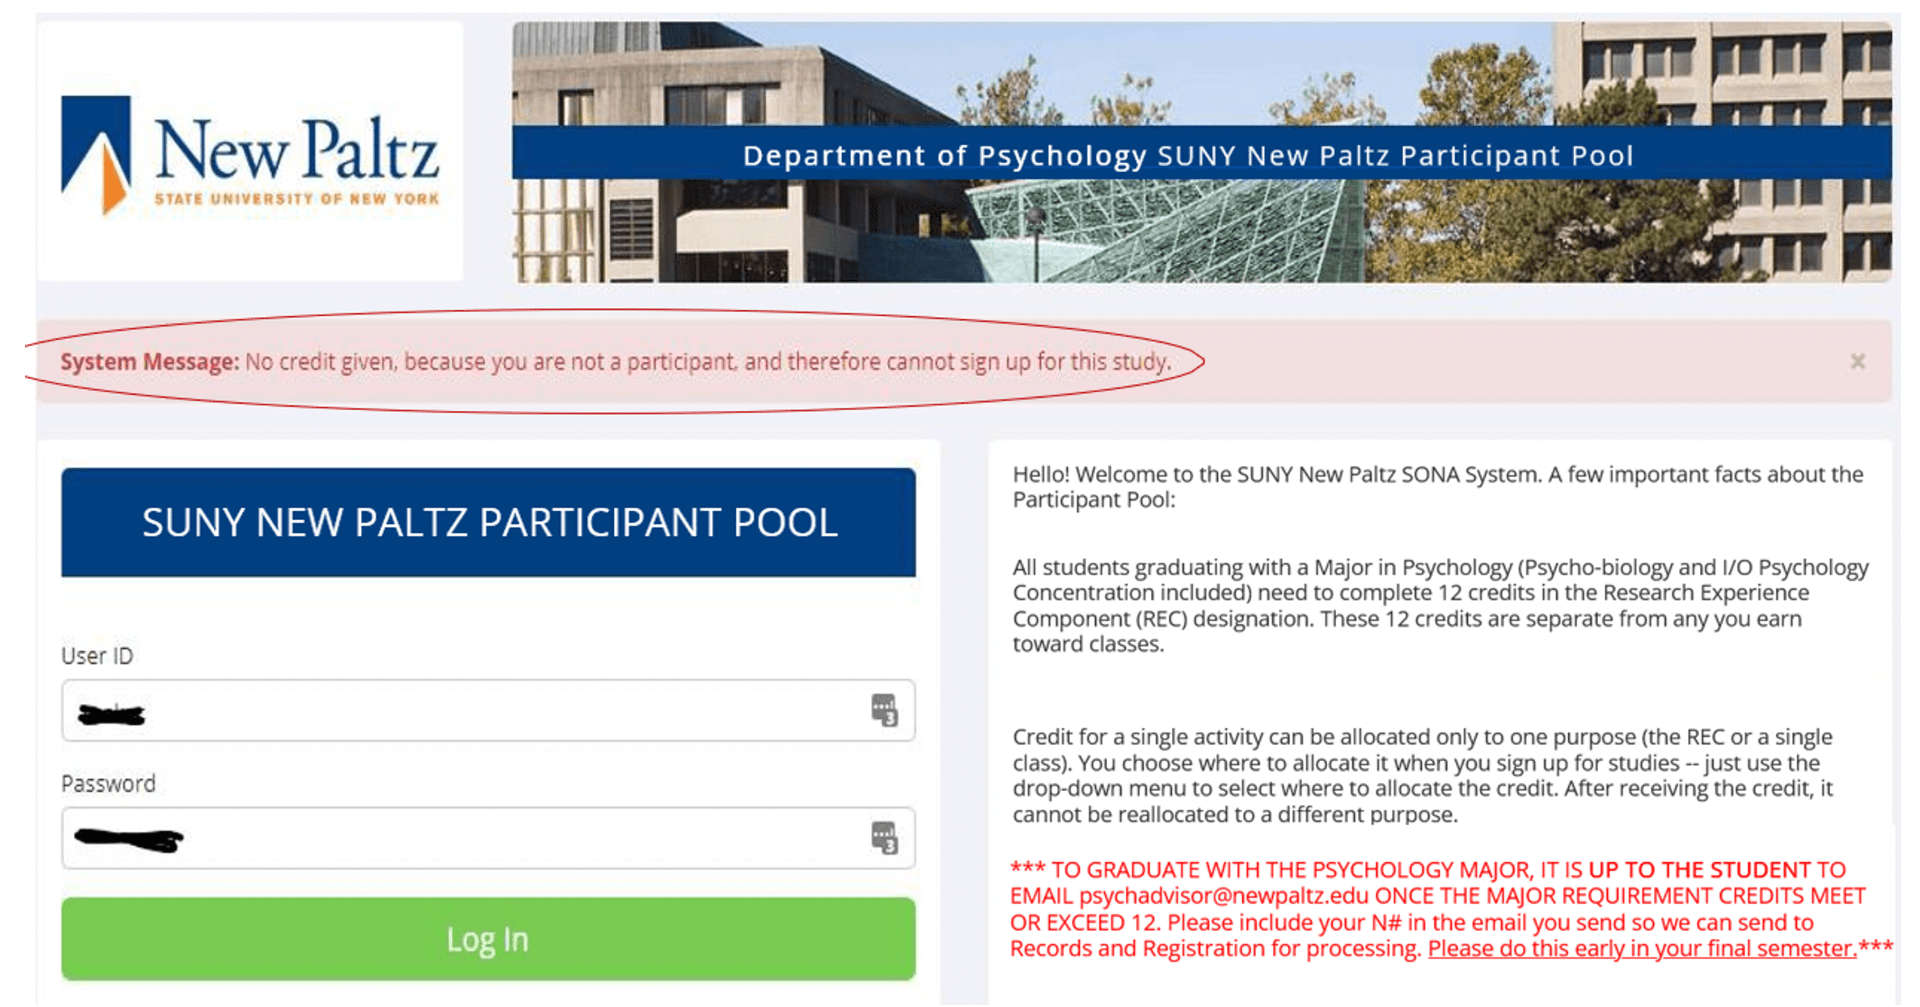
- Now complete the study; you may want to give survey answers that make it clear the data should be removed later. When the study is finished, you should be automatically redirected to the SONA login page. Because you did the study without reserving a timeslot, you will probably get the “System Message” shown below. That is fine. Just being redirected to this page means the linking has worked. If you have a different error message, however, then the linking did not work.
- If you find this technique confusing or want greater certainty that it all works fine, then here’s another method. Set up one timeslot. Then immediately log in as a student and reserve that timeslot (or have a student on your research team do this). Take the study. When the study is finished, you should be automatically redirected to the SONA login page. Sign in with your student account again to see if points were granted.
- Whichever method you use, if it worked right, congratulations! Move on to Step 7.
- If it didn’t work, revisit Steps 3 through 5 to see where the mistake is. After fixing the mistake, repeat Step 6 until it works.
Step 7: Add timeslots for your study
- Suggestion: Add just a couple timeslots as a trial run, just to make sure there aren’t any bugs. If those participants are automatically given points, then add as many more timeslots as you need.
- Please place the deadline no later than the end of the current semester. You can always add additional timeslots after the current semester finishes.
- Your student participants and the PPC will appreciate this very much. If your study’s timeslot deadline instead extend into the subsequent semester, this will create a lot of confusion and stress: for example, some students might mistakenly assume that they can get points this semester by participating in the study next semester.
- Once you have set up time slots, please make sure to click “Yes” next to the “Active?” prompt on your Study.
- If you are setting up a talk, then you should only be setting up one time slot
Step 8: Steps to take once your study is completed
- Once the study’s deadline has passed, scroll through your list of participants for that timeslot. Most should already say “Status: Point Granted.” But a few may say “Status: Awaiting Action.” If so, press the Modify button.

- On the next screen, for any participants currently with No Action Taken, select Excused No-Show. Then press the Update Sign-Ups button at the bottom of the screen.
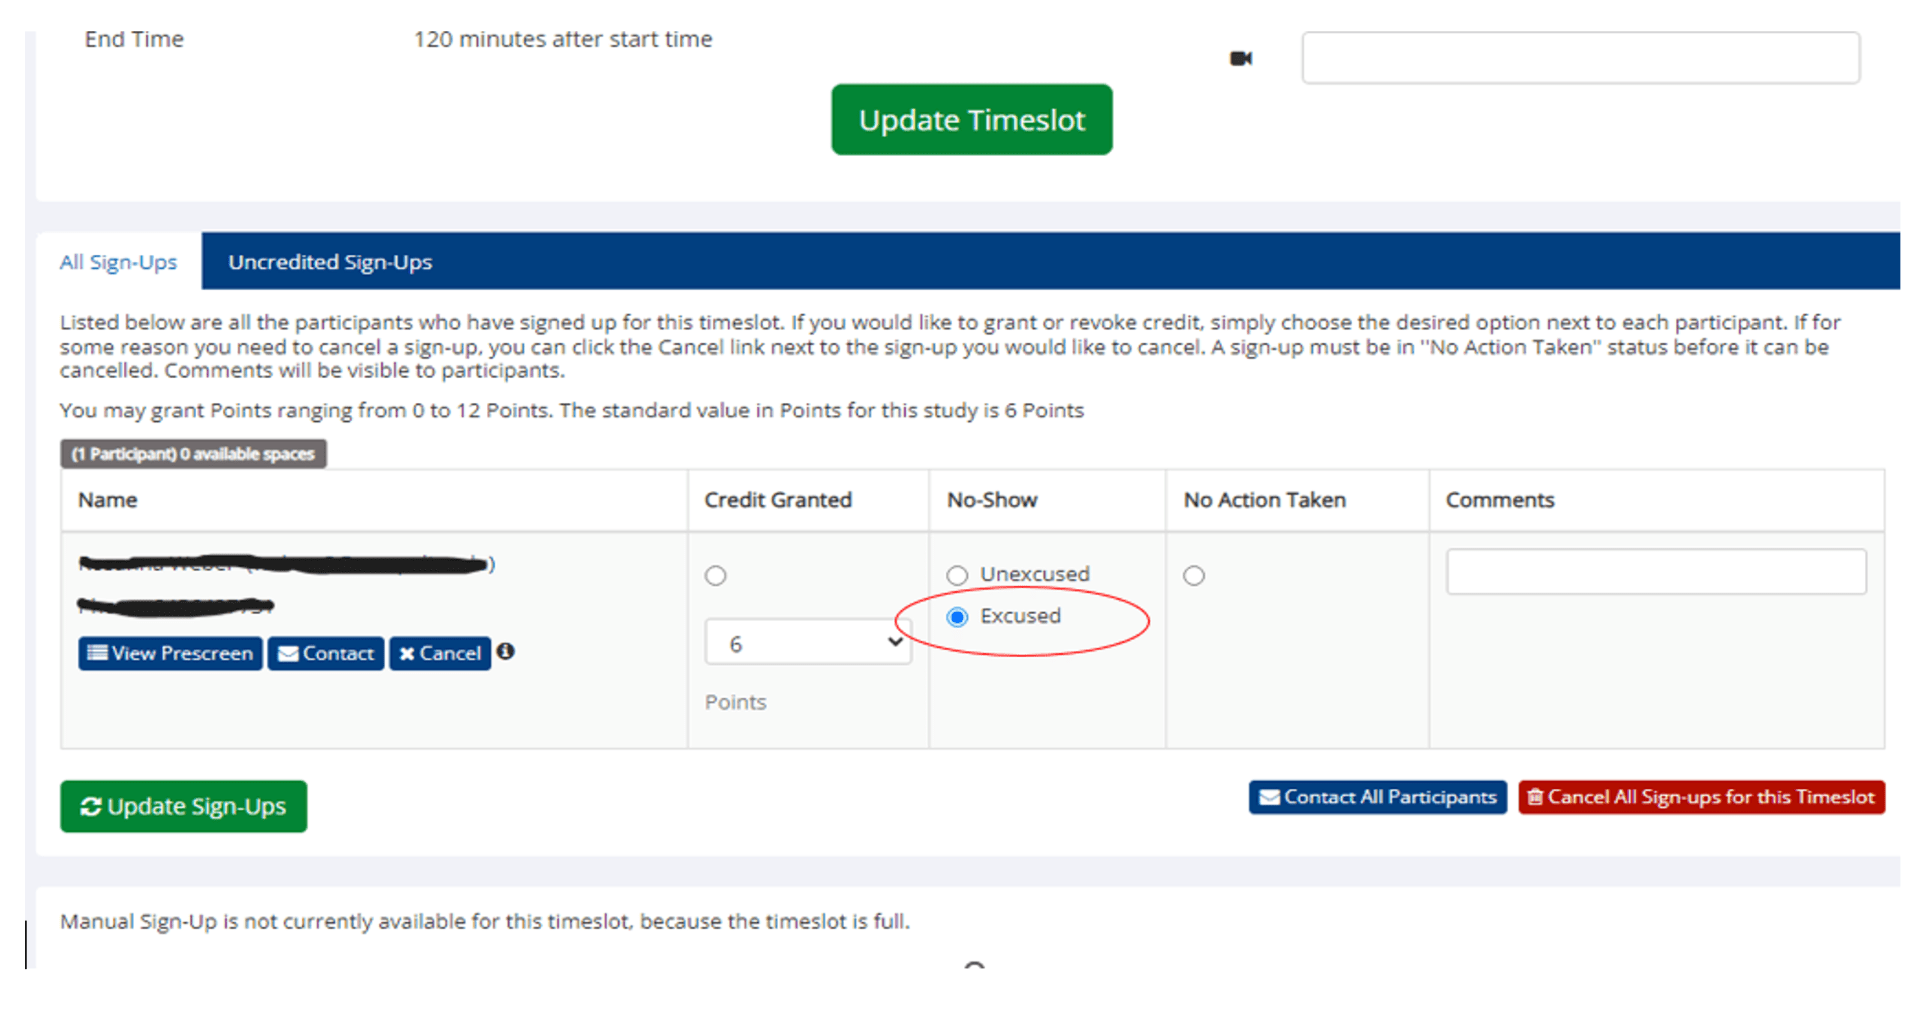
- Why the Excused No-Show option, you might wonder? This option does not penalize participants for failing to complete your study. That is appropriate for online studies, which do not require the researcher to invest experimenter time or lab space. The Unexcused No-Show option, which does penalize participants, is better suited for no- shows to in-person studies, which do invest lab time and space for each participant.
- Any participants classified as no-show can later be reclassified as point-granted, by the researcher or the PPC, if there is clear reason to believe they did actually participate but simply failed to exit the survey correctly (see Step 2).
Step 9: When your study is done
- Please click “No” on the “Active?” prompt on your study’s Change Study Information page.
SONA Central Home
