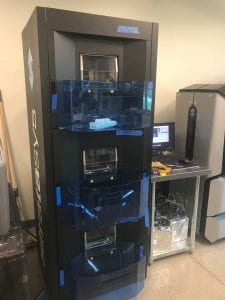
The HVAMC was one of the early adopters of the Desktop Metal Studio system which prints a variety of metals using a process called Bound Metal Deposition (BMD).  A good description of BMD is available here.  We have been interested in printing metal for a while, but the process used in most metal printers, laser sintering or laser melting, was too expensive to both purchase and operate for what we thought we could do with it.  One of the principal missions of the HVAMC is to provide state-of-the-art 3D printing and expertise to regional manufacturers and laser sintering is too expensive to generally be a viable solution for the companies we work with.  To summarize the advantages of BMD over laser sintering:

1) BMD is between 5X and 10X lower cost than laser sintering to make a part of similar quality.

2) BMD is considerably more flexible in that materials can be changed out in about an hour.  We currently run 316L and 17-4PH stainless steels and copper.  We can, if needed, also print inconel 625, H13 tool steel and Titanium64.

3) There are fewer hazards associated with BMD because it does not require working with very finely divided metal powder.

4) The standard sintering process used in BMD leads to more predictable material properties.

There are some disadvantages in that BMD is a multi-step process and has more design restrictions than laser sintering, but the dramatically lower cost makes it a useful solution for both prototyping and final part production.
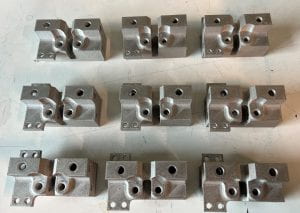
9 3D printed roller bearing parts

Most Recent Batch of JBT Parts

I would like to describe one very nice example of a final use part that we have been printing for several years now for JBT in Kingston, NY.  I would like to thank JBT for allowing me to write about this.  They have been a great company to work with because they have been willing to explore using 3D printed parts as solutions for interesting manufacturing challenges.  The parts we have been printing for them in 17-4PH stainless steel are shown to the right.  The part is a Roller Guide Saw Nozzle Block and is part of JBT’s Adaptive 3D Portioning System, a large and very sophisticated system for the rapid processing of poultry, meat and seafood.  The system simultaneously uses both water jet and mechanical cutting systems.  The part is small and complex because it needed to serve several different purposes in a limited space.  The installed part is shown below.
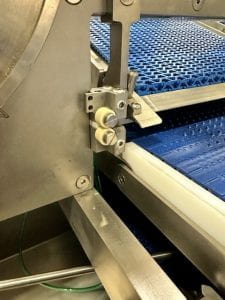
Installed Roller Guide

In a number respects, this is an ideal case for a final-use 3D printed part, metal or polymer.  Key characteristics include:

  1. Low volume.  With our Desktop Metal system, we can handle making 20-30 of these parts in a reasonable amount of time, say 2-3 weeks.  Of course this can be scaled and the relatively low cost of BMD might make that worthwhile.
  2. High complexity.  I’ll leave it to experts in machining to determine where this part could be made by CNC, but I suspect that JBT would have made it that way if they could have.
  3. Small size.  Of course larger objects are 3D printed all the time, but I believe that 3D printing is at its greatest advantage relative to machining with smaller parts.  We charge for 3D printing by the amount of material used  so a smaller 3D printed part is relatively less expensive than a smaller machined part.  The complexity of the part is not really a factor so how a designer or engineer thinks about the design and cost of an additively made part is significantly different then designing or pricing for subtractive fabrication.

I’d like to  thank JBT again for partnering with us and letting me tell this story.  I know there was a lot of  hype that suggested that a lot or even the majority of manufacturing would be done using 3D printing.  That is not likely to ever be the case, but it is worth while for designers and engineers in the manufacturing world to keep track of what’s possible because you never know when a solution to a sticky problem will be a 3D printer.  If anyone ever has any questions about whether additive manufacturing can be a solution to a particular problem, please do not hesitate to contact the HVAMC.

Keep On Printing!

Dan

I think 3D printing is an incredibly useful technology, but it definitely went through a phase of being overly hyped by the professional technoenthusiasts – that is people trying to sell something.  As “technology” has come to dominate our economy in one form or another, something new is always being hyped to the moon and back.  A good example is Artificial Intelligence.   I’m sure AI is really useful somewhere, I’m just having a hard time identifying exactly where, there are some obvious places where it has flopped such as autonomous vehicles. Five years ago there was absolute certainty that we would, by now, have fleets of Ubers running around sans drivers.  Didn’t exactly work out.  I also really hope that Tesla will get in trouble with some government agency over their “Autopilot” feature which is in the I-can’t-believe-they-can-get-away-with-calling-it-that category.  I kind of wonder if truly autonomous vehicles will be like fusion power where it will be “20 years away” for 75 years.  Don’t get me wrong, it’s a really interesting problem to work on and lots of academics are having a great time with it, but the political and social issues are always going to be hard to surmount.  Mass transit anyone?


However, my real gripe with AI is with my Prime Music feed which I assume has some AI behind it.  I listen to a collection of what my daughter refers to as “Dad Music” – Mark Knopfler, Decemberists, Josh Ritter, Tim O’Brien, etc.. Now, some of this could be construed as country, but why on earth would Prime cough up Dwight Yoakam’s rendering of Prince’s song “Purple Rain”?  Coming of age in the Twin Cities in the early ’80’s, I can really appreciate Prince, but I don’t listen to standard country and the combination of the two just struck me as wrong.  To be fair, one colleague pointed out that Dwight Yoakam looks great in tight leather pants, an aspect that I hadn’t considered, and my friend DJ Jack Straw pointed out that song was from a pretty good bluegrass album of Yoakam’s.  Be that as it may, I still think this is, AD,  Artificial Dumbness.

Keep on Printing,

Dan


PS I just read this article from the Chronicle of Higher Education on cheating on writing assignments using AI.  I’m not impressed.  It shouldn’t take much imagination to create assignments that would foil the AI.  One obvious problem the author didn’t mention, for instance, is citing appropriate sources.  An AI that would automatically generate a correctly formatted footnote would actually be worth something!

We take a lot of pride in making connections to a wide range folks in the region.  Because we have expertise in art, science, and engineering, we can work on projects from a variety of different fields.  A nice example of this is a current project that we are working on for the Eleanor Roosevelt National Historic Site in Hyde Park, NY.  They approached an art restoration company several years ago about restoring a sculpture that has been sitting by the pool at Val-Kill for decades.  You can see it in this picture from the 1940’s.  The historic site also wanted to make copy of the sculpture so they could put the original inside to protect it from further weather damage.  One of the employees of the restoration company was New Paltz Digital Design and Fabrication alumna Caryn Bylot, who got us involved in making the copy.  Because of the historical and cultural importance of Eleanor Roosevelt, it was a real privilege to have a chance to contribute, even in a small way, to the maintenance of the Val-Kill site.

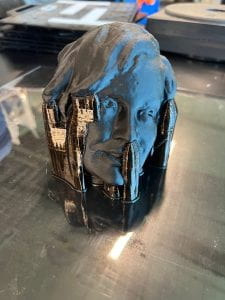
Pool boy stratue head

3D printed head of Pool Boy Statue.

Making an accurate copy of the sculpture is a multi-step process.  First it needs to be scanned to get a good digital copy.  We referred the personnel at the historic site to an excellent local scanning artist.  Our part was 3D printing the sculpture in as few pieces as possible to use as a positive to take a mold from.  For making the mold and casting the sculpture out of concrete (to replicate the original), we referred the historic site to Czinkota Studios in Gardiner, NY.  Czinkota does custom fabrication for branding, events, museums, and the theater.  We’ve worked with them on a number of projects over the past 6 or 7 years and they do really amazing work.

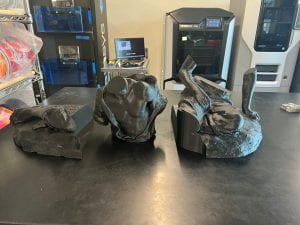
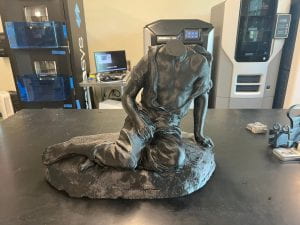
We have just finished printing the copy of the statue.  First, we printed the head and then Czinkota did a test mold to make sure their copy would be similar to the original.  Given the size of the statue, we printed it on our Stratasys Fortus 400MC printer in PC/ABS.  With its 14″x16″x16″ build volume, we were able to print the statue in just three pieces, well, 4 including the head.  The largest piece of the statue is the single longest build we have ever done on the Fortus.  It took 105 hours.  I can tell you that we sweated bullets every time a thunderstorm rolled through because if the power went out for more than a minute, we would have to start over.  Thanks to our friends at Central Hudson, we had 0 glitches and the print came out beautifully.  The pictures show the detail captured by the printer, but I think the most impressive aspect is how well the three pieces fit together.  Each of those builds was thousands of layers and the pieces fit together essentially seamlessly.  The precision of the Fortus 400 is rated at 0.005″.  This is, of course, important in many industrial applications, but it’s a real benefit in art reproduction as well!  We will update this as this project continues.

Rest of statue in pieces

Rest of statue assembled


We have had our Desktop Metal Studio printer for a couple of years now.  The first year was, frankly, at bit trying at times.  There were quite few glitches.  However, the steady effort by their support team (with some behind the scenes re-engineering) has really paid off and we are feeling increasingly confident that we can reliably use it for part production for both campus projects and our local company partners.

We recently upgraded to Studio II.  If you are not familiar with the difference, Studio I was a 3 step process.  The part was printed and then went through a debinding step which was a chemical wash using 1,2-dichloroethylene (standard industrial degreaser).  I assume there are some additional additives, like surfactants, but material data sheets aren’t what they used to be.  The third step is the sintering step.  For small parts, the debinding step would take 24-48 hours and go through about $100 of the debinding fluid.  The sintering step was another 40-48 hours.

With the Studio II upgrade, the chemical debind step is skipped and the binding agent(s) are removed thermally in the sintering oven.  This is generally an improvement because it saves the cost of the debind fluid.  It does go through more of the purge gas used in the sintering over, though.  The total cycle time is about the same because it takes 48 hours or so to go through the thermal debind process before it can ramp up to sintering temperature.  It’s still much more convenient because you can essentially hit the button and walk away until the whole process is complete.  Not that some of the materials (like copper) do still require the chemical debind step so we aren’t throwing our debinder yet.

Switching from Studio I to Studio II required upgrades to the printer and the furnace.  the Studio II materials have to be printed in a heated build chamber.  Apparently, the system was always set up to do that and they should have just been able to enable it.  Turned out to be a little more complicated than that …..  Anyway, it seems likely that they were planning this switch all along.  I won’t speculate as to why they didn’t do this from the beginning other than to say that the Studio II came out suspiciously close to when Stratasys’ patent for heated build chambers lapsed.  I’m sure that was completely a coincidence.

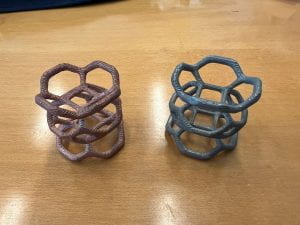
We had been running a lot of 17-4PH Stainless using Studio I with good success.  The first two materials we tried with Studio II were copper and 316L Stainless (pictured below).  What we found was that we could print even complicated shapes like these lattices more reliably with the Studio II.  We were able to get this part to print in Studio I 17-4PH, but only 1 out of 3 attempts survived.

We were attracted to the DM system from the beginning because it has a lot of the of benefits of our Stratasys FDM polymer printers relative to laser sintering.  Much lower cost, no hazardous powders to deal with and it’s very easy to switch between different materials.  We’ve been able to get useful parts out of it since we got it and it’s reliability and ease of use have increased markedly in the last year.  Like with everything in 3D printing it is not the solution, but it is a very useful solution for a lot of practical problems.

Keep On Printing!

Dan

Copper and 316L lattices printed using the Desktop Metal Studio II printer.

As the US Congress works through the latest debt limit crisis, it seems likely that the minting a trillion dollar coin will come up again.  It occurred to us in the HVAMC that, to our knowledge, nobody has proposed a design for the trillion dollar coin.  We offer a modest example here.

coin back coin front

However, in designing this coin, we realized (based on an occasional reading of Paul Krugman’s NYT column) that we were breaking new ground in modern currency theory.  This coin, supported by our proprietary blockhead chain technology, is designed for a post-modern, industry 4.0 based society.  It is gluten free, fully vegan and available as a non-fungible token.  Or perhaps as an anti-fungal token.  We’re still trying to figure out the difference.  We submit this coin as an example of the natural successor to cyber currencies where each coin is unique, artisanally crafted and worth whatever we say it’s worth.  This is art as currency where it will never be sullied by using it in something as crude as a economic transaction.

For those interested in technical details, this coin was created from photographs using a Grasshopper Definition written by Prof. Aaron Nelson and printed on a Stratasys J735 polyjet printer.  The coin was finished by Kat Wilson by coating with a dilute solution of black paint which was then removed leaving paint in the depressions to heighten contrast.

Keep On Printing!

Dan

PS Aaron insisted on putting my face on the coin.  I have no idea why.

PPS We are offering this for sale at the modest cost of 1/1000 of the face value. We promise to never make another one like it unless we really want to.

PPPS If you work for the US Treasury, this is all a joke.

PPPPS It’s been a really long semester.

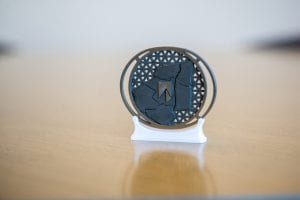
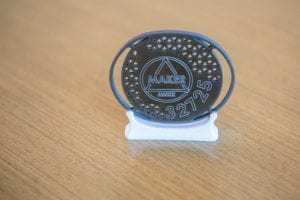
This Medal was designed as a thank you and memento to all of those who came together at the start of the pandemic in 2020 to donate their time, money, expertise, and materials to create 3D printed face shield PPE when there was a shortage in the Hudson Valley.

Created by the students, staff, and faculty in the Hudson Valley Additive Manufacturing Center using an amalgamation of digital fabrication processes, the medal is 3D printed in 17-4 PH Stainless Steel from a Desktop Metal Studio System and then cut on a HAAS TM-2P 3 axis milling machine to create the machined features. After being hand finished, the medal was engraved using the HAAS mill.

A custom 3D printed fixture made of 9085 ULTEM was designed and produced using a Stratasys Fortus 400MC to hold the part in the milling vise for the machining steps.

The outer borders take their shape from the final design of the band of the face shields, as optimized for 3D printing. The background displays the counties in the Hudson Valley where the face shields were produced and distributed, reflecting the collective nature of the work. At the center is the logo for SUNY New Paltz, where the project originated. The reverse side is engraved with the date and a maker mark with the number “32725” representing the total number of face shields created by the HVAMC and our partners.

medallion front

Medallion Front

medallion back

Medallion Front


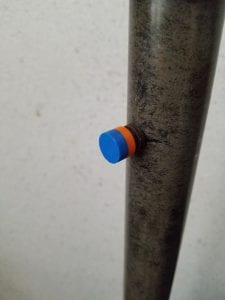
lamp with 3D printed knob

Lamp with 3D printed knob

Here’s a couple of interesting, and very simple, applications of 3D printing that actually saved our campus a significant amount of money.  It is important to emphasize up front that we were able to help with these projects because we have colleagues who have gotten the idea that we can fabricate small plastic parts quickly and easily.  This awareness of the potential for 3D printing should not be taken lightly and it needs to be nurtured to help to find these types of applications.

Application #1

Knobs

Lamp Knobs

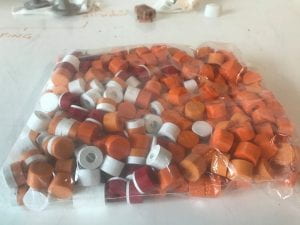
Many of our dorm rooms have a floor standing lamps.  These have been around for a while.  They still work fine, but the single point of failure is the knob that turns the light on and off and they are broken on most of them.  Corinna Coracci, our Director of Residence Life, asked us whether we could make replacement knobs to avoid replacing the lamps.  Designing the knob took about 5 minutes (I did it and I’m really slow at CAD).  We have been printing them out of ABS on our Stratasys Dimension 1200ES.  We print about 100 at a time and have been using up some cartridges that only had one or two in3 of filament left so we end up with some stripy knobs (pictured at right).  So far, we have printed about 1200 which has saved the college over $10,000.

Application #2

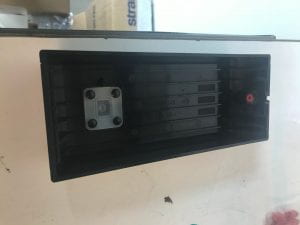
Our IT folks came to us with these boxes which hold the electronics for the key card readers that have been installed throughout campus.  Each box costs about $75 and has boss with a hole in it where the

Key Card Reader Box

Key Card Reader Box with 3D Printed Insert

box is screwed into the wall.  The problem is that the boss breaks off.  Again, in about 5 minutes, we designed a 3D printed insert that replaced the boss (it’s the red part shown in the picture).  This was also printed out of ABS on our Stratasys Dimension.  So far, we have printed 50 of the inserts saving the campus almost $4000.

Application #3

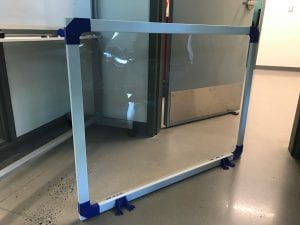
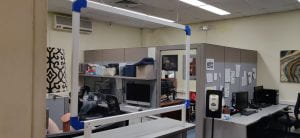
For a lot of educational institutions, part of the planning for the 21-22 academic year was to source clear barriers to provide a physical barrier between faculty/staff/students in a variety of settings to reduce COVID transmission.  If anyone was paying attention to plexiglass prices in 2020, it went up pretty dramatically.  The campus started trying to source plex shields and found that they were well over $150 each for a relatively small, self-standing shield.  We decided to see if we could design and build our own, but to save money and to fabricate them out of more eco-friendly materials than plexiglass.  What we ended up designing was essentially a “window frame” constructed by 3D Printed PLA corner braces holding together lengths of 1″x2″ MDF board.  The clear plastic is 5 mil PETG left over from our faceshield project.  The plastic was held onto the MDF with double-sided carpet tape and staples.  We made a free-standing version with 3D printed Hawk Feet and a hanging version with eye hooks screwed into the top.  These were also larger than any of the commercially available plex models – our standard size was 48″x40″, but they can me easily modified.  We made over 120 of these that were deployed in offices and classrooms.  Except for the PETG and staples, everything is biodegradable.  We charged the campus $25/each, generating a minimum savings of $15,000.

Of course, we started hearing more recently that the barriers may not be a good idea, particularly in small spaces, because they interfere with ventilation which is needed to sweep out any virus particles.  They did seem like a good idea at the time!

free standing barrier

Free standing barrier

Hanging barrier

Hanging barrier

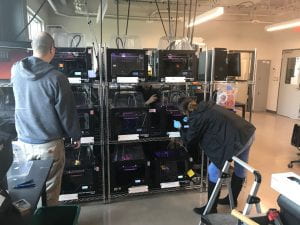
SUNY New Paltz was the first college in the world to install a large array of 3D printers, at the time marketed

Our Array of Replicator 2 printers

by Makerbot as the Makerbot Innovation Center.  Thank to my friend Wallace Patterson for first bringing this idea to us!   We started up in February of 2014 with 25 Replicator 2 printers and 5 of the Replicator 2X.  And some scanners that never worked, but the less said about that the better. The Replicator 2 has been an outstanding printer and we have put thousands of hours on ours.  They are used constantly to support a wide variety of academic programs as well as external customers.  All of them have broken down, but thanks to my colleague Aaron Nelson’s ability to fix just everything and the work of our talented team of undergraduate interns, they are pretty much all still functional.  We have made some modifications.  Aaron and Mitch Wagner developed a control system using BotQueue and Octoprint so we could control them remotely, we have fully enclosed the printers to address health and safety concerns and we have replaced the build plates with a flexplate system.  We have been considering replacement options and thought that it would be interested to share these options and invite comments.  Note that an important component of whatever we do is our Stratasys Continuous Build Stack.  This does give us the ability to produce a lot of parts

Stratasys Continuous Build Stack

very quickly and the recently upgraded software has significantly improved its functionality.  It’s main drawback is that it only prints ABS and, from an environmental perspective, we would greatly prefer to use PLA for the thousands of student printers we do in a year.  And, frankly, the quality of a Stratasys printer is kind of overkill for beginning designers.

So here are the options we are considering:

#1 – Continuing to fix and upgrade the Replicator 2’s. This has been are favorite approach for a while because these printers have a really robust frame and are mechanically solid.  We would probably do that except we would need to replace all of the belts and bearings and we would really like to upgrade the electronics to take advantage of some newer features like using a touch probe and 256 microstepping.  Aaron looked at replacing the Replicator 2 board with something open source, but it turns out that would require also rewiring all of the end stop and stepper connections.  Next!

#2 – Purchasing a lower end open-source-type printer.  The one we considered the most seriously is the Prusa i3 Mk3  which runs around $1000 assembled.  We borrowed one from our CS Department last year in the faceshield frenzy and worked it pretty hard.  It’s a nice printer.  Our only issue is that it’s a completely open build platform and we have run into issues with our EHS folks about the potential nasty effects of nanoparticles being released from the hot end.  Enclosing the printer seems to mitigate that and also does improve print quality, especially for materials other than PLA.  because of the Prusa’s configuration and our space limitations, we haven’t figured out a good enclosure solution.  Next!

#3 – Purchase a lower end, enclosed commercial printer.  We dismissed this option in about a nanosecond.  From everything we have seen, these printers are not built with parts that are better (or even as good as) the Replicator 2.  We suspected within a year we would be right back where we started from and the printers would probably be even harder to repair than the Replicator 2’s.  Next!

#4 – Purchase higher end “desktop” printers.  These range from something like the Makergears (we own several of them and have been pretty happy with them) to the Makerbot Method to the enclosed versions of the Ultimaker.  These printers range from $3-7k or so.  We need a minimum of 15 printers in the array to meet our needs and buying 15 printers at this price range would be pushing our budget.  Since no matter what printer we bought, we work them hard enough that they will break regularly.  Generally, the more expensive the printer, the less open source it will be and the greater the maintenance cost.   Next!

#5 – High throughput printers.  We never really considered this very seriously, but it’s a neat idea.  There are printers that will run multiple jobs in a row without human intervention so each printer can run 24/7.  Since our Replicators probably only run 50% of the time even where we are busy, this would significantly improve efficiency.  The two main options are continuous belt printers and printers that swap build plates.  We investigated a few options, but reviews and our innate suspicion of relatively untested technologies suggested the time wasn’t right..  Next!

#6 – Build them ourselves.  This is the option we are currently pursuing using the VORON platform.  This is a open source printer that uses components that are as high end as can be reasonably purchased.  Both my colleague Aaron and I have built printers from a kit or from scratch and it’s surprisingly easy.  Our goal is to build a printer with similar quality mechanical components to what we could purchase in option #4, but only spend about $1500 per printer plus a couple of thousand dollars in intern time to do the assembly.  We also have the advantage in being able to print the plastic components out of PC/ABS on our Stratasys printers which will give very high quality parts.

Since this would give us an entirely open source printer we could upgrade easily as new options become available.  This not only seems to be the economical option, but fits our philosophy of pushing the envelope in practical applications of 3D printing.  We are getting ready to assemble our first printer and we will provide updates as they become available.


Keep on Printing!

Dan

When the HVAMC got started, we really wanted to help support the development of new products from inventors in the region.  There have definitely been some successes.   HeartMoves  and Plant Seads  are both companies where we helped at the prototype stage and they have subsequently gone into production with the help of our friends at USEHCO.  The very smart folks behind these two companies, Paul Widerman at HeartMoves and Bryan Meador at PlantSeads, either had significant experience as an entrepreneur or training as a product designer.

However, there have been a lot of other potential inventors we have helped get to the prototype stage where there hasn’t been much further progression so I wanted to offer some suggestions to anyone who is thinking about building the next great mousetrap, but doesn’t have much experience.

1. Intellectual property is not all it’s cracked up to be.  We’ve seen a lot of inventors who have spent considerable time and money getting a patent because that’s often held out as the first step. The reality is that much of the work to make an idea valuable is in the detailed work that goes into the design and marketing and you are probably better off perfecting the design first to make sure the idea works before investing in the patent process.  I’m probably going to get some pushback from any patent attorneys who read this and I welcome the discussion.

2. We often see inventors with a single idea.  The successful inventors we have worked with have a LOT of ideas, most of them lousy, but they keep generating idea after idea and then sort out the best ones.  If you have one good idea, great, but you should have a bunch.

3. Turning an idea into a product is a long and involved process.  There is a reason that people major in college industrial design programs.  There are many things you have to think about to get to a product that someone will pay you for.  The two most important things are a good prototype and a very critical eye.  Expect to go through many prototypes before you reach a final product.

4. Before you pay for having CAD drawing made and a 3D printed prototype, make a prototype from cardboard, duct tape, etc..  You will be amazed at how much you can learn.

4. Think about scale up from the beginning.  It’s very unlikely that 3D printing will be a method for making your final product because it is too expensive for anything other than very specialized and complex objects that have a high value.  This means that you will need to use something like injection molding, thermoforming, etc..  Become informed about these processes and what their requirements and limitations are.  Be prepared to spend money.  Cutting a mold for these processes can easily be from $5000-$50,000 or higher in addition to the per part cost.  However, you don’t even want to think about scale up until you have a really good prototype.

5. If your invention requires electronics and/or software, the design cost and complexity goes up exponentially.

What can the HVAMC do?  First, we can prepare a CAD model from your drawings which is necessary to make a prototype using any digital fabrication method such as 3D printing.  What we ask for are detailed drawings with accurate dimensions from which we will prepare the CAD model and prototype.  We can give you some basic feedback such as how small can something be and still print or what kind of tolerance can you expect.  Will the first version suck?  Yes, that’s very likely.  We will make suggestions and help you move the process, but it’s your design.  Yes, going through a bunch of prototypes will cost some money, but if you are going to be an inventor, this is what you need to do.  The HVAMC can also connect you to the regional ecosystem of design and fabrication firms that can supply a huge range of expertise.  There are incredible resources in the Mid-Hudson Valley and New York State and it’s a good idea to take advantage of them.

My point is not to discourage anyone from trying their hand at inventing.  It is a very satisfying and exciting process, but go into it with your eyes open!


Keep on Printing!


Dan

The is the second post by summer intern Alex Peraza in a series on recycling plastic into 3D printer filament using Filabot equipment.  See here for the first post.


Materials

To start with, we will be focusing on trying to recover the most common 3D printing waste product: PLA. We use PLA for the vast majority of prototypes and student builds, so we have a lot of it. Next, we will look at ABS, PC-ABS, and PETG, which are the more common materials used for end-use parts. Lastly, we will look into repurposing PET and HDPE plastic waste such as bottles and packaging into printer filament, as well as experiment with custom blends and fillers.

PLA Waste

Even more PLA waste


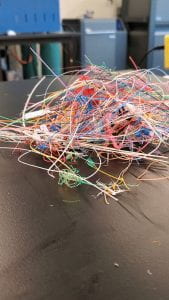
We also have quite a bit of this stringy stuff. Since this is PLA, it could just be trashed or composted, but we want to see if we can do anythng with it. Heating it up with a heat gun and crushing it into a ~2” flat bar seemed to work fairly well in the Reclaimer.

And yet more PLA waste

Grinding

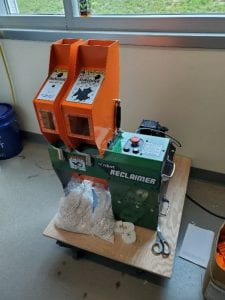
The first step in recycling old parts, supports and scrap filament is to break it down into small enough pieces that it can be fed into the extruder. The Filabot Reclaimer has two grinding sides, the Shredder and the Granulator. Parts under 3” in all directions can be fed into the shredder, whose output can be fed directly into the Granulator side. Since the hoppers for both are side by side, you have to manually dump the shredded material into the granulator. Anything over 3” must be broken down by hand, but a canvas drop cloth and a large mallet work well for that (and for taking out your frustrations on your failed prints!).  We would be interested in hearing from anyone who has found a better solution, though.  Maybe a small electric chipper/shredder?

Filabot Granulator and Shredder

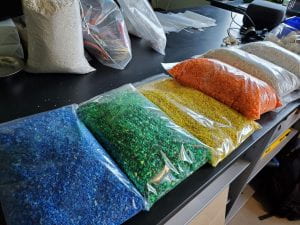
Here’s the result of running our scrap PLA through the Filabot Reclaimer.

Shredded and Granulated Scrap PLA